
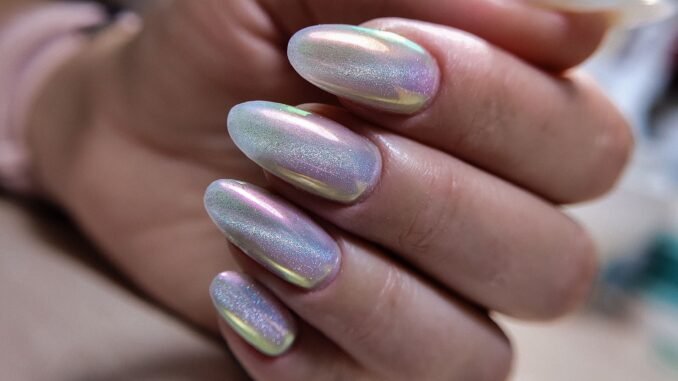
If your manicure looks subtle in daylight but explodes into a field of glittering sparks the moment a flash hits it, you have discovered reflective nails. This trend blends ultra-fine light-reflecting pigments into gel polish, creating a finish that shifts from soft shimmer to full disco-ball glow depending on the light. Loved by celebrities, nail techs, and Pinterest creators alike, reflective nails deliver maximum impact with minimal design effort. Whether you prefer a sleek silver sheen or a deep midnight blue that ignites under camera flash, this guide walks you through everything you need to know about the look, from the science behind it to application tips, color ideas, and care.
What Are Reflective Nails?
Reflective nails are a gel manicure made with special reflective glitter polish that behaves like the reflective striping on a running jacket. In normal indoor or daylight, the nails look like a soft metallic or lightly sparkly manicure. Under direct light, camera flash, or sunlight, thousands of micro-reflective particles bounce the light back, producing an intense, almost neon sparkle that photographs beautifully.
The effect comes from pigments far finer and more light-reactive than ordinary cosmetic glitter. Because the particles are suspended evenly in a gel formula, the glow looks smooth rather than chunky. This is what separates reflective polish from standard glitter polish, which sparkles constantly but never reaches that dramatic flash-lit intensity. On Pinterest, the before-and-after contrast between daylight and flash photos is exactly what made the trend explode. Salons report that reflective sets now outsell standard glitter two to one during party season, proving the trend’s remarkable staying power.

How Reflective Gel Polish Works
The magic ingredient in reflective gel polish is a blend of micro-fine reflective particles, often derived from the same optical technology used in safety gear. These particles act like tiny mirrors, each one catching incoming light and reflecting it straight back toward the source. When hundreds of thousands of them sit in a single coat of polish, the combined reflection creates the signature blinding shimmer.
Unlike holographic polishes, which split light into rainbow colors, reflective polishes mostly return light in the color of the base. A silver base flashes silver-white, while a deep burgundy base flashes warm red sparks. The density of the particles determines intensity, which is why most reflective gels reach full effect in just two thin coats. Quality matters here: premium formulas suspend particles evenly so the glow looks uniform instead of patchy. This even suspension also means the polish applies smoothly, without the gritty texture that cheaper glitter formulas often leave behind.

Flash Versus Daylight: The Two Faces of the Look
One of the most appealing things about reflective nails is that you get two manicures in one. By day, they read as an elegant, slightly luminous polish that works in offices, classrooms, and anywhere a loud manicure might feel out of place. The finish is polished and sophisticated, with just a whisper of sparkle visible on close inspection.
By night, under streetlights, club lighting, or a phone flash, the same nails transform into a show-stopping glitter display. This duality makes reflective nails a favorite for events, concerts, and vacations where photos matter. Many wearers describe the reveal moment as the best part, when a casual daytime look suddenly becomes the centerpiece of every photograph. It is drama on demand, controlled entirely by the lighting around you. Keep your phone flash handy at events, because capturing the daylight-to-flash transformation on camera is half the fun.

Choosing the Right Base Color
Base color shapes the entire personality of a reflective manicure. Light bases like silver, champagne, and pale pink produce a bright, icy flash that feels glamorous and festive. Dark bases like black, navy, forest green, and deep plum create a more dramatic contrast, where the sparks seem to float above a velvet-dark surface like stars in a night sky.
When choosing, think about your wardrobe, skin tone, and how often you want the daytime version to stand out. Neutral bases are the most versatile and forgiving for first-timers. If you love bold color, jewel tones deliver the richest reflective payoff. Many nail techs recommend starting with a medium-toned base, such as mauve or slate, which balances daytime subtlety with an impressive nighttime transformation. When in doubt, ask your tech to paint one test nail so you can preview both the daylight and flash versions before committing.

Silver Reflective Nails: The Classic Choice
Silver is the shade that launched the reflective nail trend, and it remains the most requested color in salons. A silver reflective manicure delivers a clean, mirror-like flash that pairs with everything from evening gowns to streetwear. In daylight it reads as a sophisticated metallic; under flash it becomes pure light.
Silver works beautifully across all nail shapes and lengths, which is part of its staying power. Short, natural nails in reflective silver look chic and modern, while long coffin or stiletto shapes in the same shade turn full glam. If you can only try one reflective shade, make it silver. It photographs flawlessly, complements every skin tone, and never looks dated, making it the safest entry point into the trend. Silver also grows out gracefully, since the metallic finish disguises the regrowth line far better than most solid colors do.

Holographic Reflective Finishes
For wearers who want even more dimension, holographic reflective finishes combine the flash-reactive sparkle with a rainbow color shift. These formulas contain both reflective particles and holographic pigments, so the nails shimmer with prismatic color in daylight and ignite under direct light. The result is a manicure that never looks the same twice.
Holographic reflective nails are especially popular for festivals, summer vacations, and anyone who loves a maximalist aesthetic. They pair well with simple outfits, since the nails become the accessory. Keep in mind that the rainbow shift can make the daytime look busier than a standard reflective polish, so this finish suits confident wearers who enjoy attention on their hands. Layered over a dark base, the effect is pure galaxy. Seal holographic sets with an extra layer of top coat, because the added pigments can wear slightly faster at the free edge.

Reflective French Tips
The French manicure gets a modern upgrade when reflective polish replaces the traditional white tip. A nude or sheer pink base keeps the look timeless, while reflective tips add a hidden surprise that only reveals itself in the right light. It is the perfect compromise for anyone who loves classic nails but craves a touch of trend.
Reflective French tips work in any color combination. Silver tips on a nude base are the most popular, but black reflective tips on a milky base create a striking edgy contrast. Nail techs can paint the tips freehand or use guides for crisp lines. For a softer take, try a reflective ombré tip that fades into the base, blending the two finishes seamlessly for an elegant, wearable result. For extra longevity, ask for reflective tips to be encapsulated under a clear builder layer that shields them from daily wear.

Reflective Ombré Designs
Ombré and reflective polish are a natural match. A gradient that fades from a solid color at the cuticle to a dense reflective glow at the tip creates depth that flat polish simply cannot achieve. The fading concentration of particles means the sparkle intensifies toward the free edge, drawing the eye along the full length of the nail.
The most flattering version blends a neutral base into silver or champagne reflective tips, but bolder gradients, like deep purple melting into reflective magenta, make a statement. Achieving a smooth ombré requires sponging or careful brush blending before curing, so this design is best left to an experienced tech unless you practice the technique. The payoff is a manicure that looks custom and expensive from every angle. Pair an ombre set with minimal jewelry so nothing competes with the gradient’s gradual, luminous build of light and sparkle.

Reflective Nails for Short Nails
Short nails and reflective polish are a perfect pairing. Because the formula delivers impact through light rather than length, even a neat, short manicure gets the full wow effect. Reflective shades also make short nails look more polished and intentional, since the shimmer draws attention to a tidy shape and clean cuticles.
On short nails, stick to one or two coats for a refined finish, and consider lighter bases that keep the look fresh rather than heavy. Squoval and rounded shapes show off reflective polish beautifully because their curved surfaces catch light from multiple angles. If you keep your nails short for work or practicality, reflective polish is one of the easiest ways to make them feel special without adding length. A glossy top coat refresh halfway through wear revives the shine and can extend a short reflective manicure into week three.

Long Coffin and Stiletto Shapes
Long nail shapes turn reflective polish into a full event. Coffin, stiletto, and long almond shapes offer a larger canvas, which means more surface area for the particles to catch light. The result is a bolder, more dramatic flash that reads beautifully in photos and across a room.
On long nails, deeper base colors truly shine, creating that starry-night effect wearers love. The extended length also opens up design options: reflective full coverage on every nail, alternating reflective and solid nails, or intricate art layered over a reflective base. Just remember that longer nails need proper structure and apex placement to support the look, so invest in a skilled tech or quality press-on system. Long shapes show more surface and therefore more imperfections, so precise cuticle work matters even more at these lengths.

DIY at Home: What You Need
Doing reflective nails at home is entirely achievable with the right supplies. You will need a UV or LED lamp, a base coat, the reflective gel polish of your choice, a no-wipe top coat, plus standard prep tools like a nail file, buffer, cuticle pusher, and lint-free wipes with alcohol or cleanser. A quality lamp is the single most important investment, since under-cured gel leads to chipping and dullness.
Reflective gel polishes are widely available from professional and consumer brands, with options ranging from budget-friendly to salon-grade. Read reviews and look for swatch photos taken with flash so you can judge the true reflective intensity. Start with one shade before building a collection, and always check that your lamp’s wattage matches the polish manufacturer’s curing recommendations for best results. Practice on a nail wheel first to perfect thin, even coats without wasting product or risking a messy result on yourself.

Salon Versus At-Home Application
Choosing between a salon visit and a DIY manicure comes down to budget, skill, and the complexity of the design. A salon reflective gel manicure typically costs between thirty and sixty dollars, and you get professional prep, precise application, and designs like ombré or French tips that are tricky to master alone. For special occasions, the salon route is worth it.
At-home application costs less per manicure after the initial kit investment and gives you freedom to experiment. Simple full-coverage reflective nails are very beginner-friendly since the sparkle hides minor imperfections. However, removal, shaping, and intricate designs are harder solo. Many enthusiasts do simple reflective sets at home and book salon visits for statement designs, getting the best of both worlds. Whichever route you choose, keep reference photos open while you work so your original vision stays clear from start to finish.

Curing and Application Tips
Proper application is what separates a stunning reflective manicure from a dull one. Start with thorough prep: push back cuticles, gently buff the nail surface, and dehydrate with alcohol. Apply a thin base coat and cure fully, then apply the reflective polish in two thin coats rather than one thick coat, curing each layer for the full recommended time. Thick coats trap uncured gel and mute the reflective effect.
Cap the free edge with each coat to prevent lifting, and finish with a glossy no-wipe top coat, which actually amplifies the flash effect by creating a smooth, glass-like surface. Avoid touching the nail surface between coats, since oils and dust dull the particles. If your reflective polish looks muted, the most common culprits are under-curing or overly thick application, both easy to fix on your next set. Between manicures, wipe your lamp’s interior with alcohol, since dust on the bulbs quietly reduces curing power over time.

Combining Reflective Polish with Chrome Powder
Layering reflective polish with chrome powder creates one of the most eye-catching finishes in nail art. The chrome delivers a liquid-metal mirror effect in daylight, while the reflective particles underneath ignite under flash. Together they produce a manicure with unmatched depth and shine that shifts dramatically with the lighting.
The technique is straightforward: apply and cure your reflective base, then burnish chrome powder over a no-wipe top coat before sealing everything with another top coat. Silver chrome over silver reflective polish is the classic combo, but colored chromes over contrasting reflective bases create custom effects. This layered approach is advanced enough to look salon-exclusive, yet simple enough for confident DIYers to try at home. Finish with cuticle oil massaged around each nail, which makes the metallic surface appear even more luminous by contrast.

Seasonal Color Ideas
Reflective nails adapt beautifully to every season with a simple shade swap. Fall calls for warm, moody bases like burnt copper, deep olive, and spiced burgundy that glow like embers under evening light. Winter is peak reflective season: icy silver, frosty blue, and champagne feel made for holiday parties and New Year’s Eve photos.
Spring invites softer choices such as reflective lilac, blush, and mint that sparkle like morning dew, while summer suits vivid corals, turquoise, and hot pink that pop against sun-kissed skin. Because the reflective effect reads differently in each season’s natural light, rotating your shade keeps the trend feeling fresh year-round. Many wearers build a small seasonal rotation of three or four favorite reflective shades. Label polish bottles by season with a small sticker, so your perfect shade is always easy to find when inspiration strikes.

Reflective Nails for Special Occasions
Weddings, proms, holiday parties, and concerts are where reflective nails truly earn their reputation. Under event lighting and camera flashes, they photograph like jewelry, adding sparkle to every close-up of your hands, from holding a bouquet to raising a glass. Brides increasingly choose soft reflective shades that look classic in person and magical in flash photography.
For formal events, keep the design elegant: a single reflective accent nail, delicate reflective tips, or a sheer reflective overlay on a neutral base. For concerts and festivals, go bold with full-coverage dark reflective shades that ignite under stage lights. Matching your nail shade to your outfit’s undertones ties the whole look together and makes the manicure feel intentional rather than random. Do a trial run two weeks before any big event, leaving time to adjust the shade or design without last-minute stress.

Nail Care Under the Glitter
Glitter formulas get a reputation for being harsh, but reflective gel polish is no harder on nails than standard gel when applied and removed correctly. The key is protecting the natural nail underneath: never skip base coat, keep prep gentle rather than aggressive, and give nails an occasional break between sets if they feel thin or brittle.
Daily care makes the biggest difference. Massage cuticle oil into the nail beds every night to keep the surrounding skin supple and prevent lifting, wear gloves for cleaning and dishwashing, and avoid using nails as tools. A well-maintained reflective manicure can last three weeks or more, and healthy underlying nails mean each new set looks better than the last. A keratin or silk treatment between sets rebuilds strength if your nails ever feel thin after back-to-back gel manicures.

Removal Without Damage
Safe removal protects everything you built during wear. Start by gently filing the shiny top coat to break the seal, which lets remover penetrate faster. Soak cotton pads in pure acetone, place one on each nail, and wrap with foil for ten to fifteen minutes. The reflective layers should crumble and slide off with gentle pressure from an orangewood stick.
Never peel or force off gel, since that lifts layers of your natural nail along with it. If polish resists, rewrap for another five minutes rather than scraping harder. Reflective particles can leave a faint shimmer on the nail plate after removal; a soft buffer pass removes it easily. Finish with cuticle oil and a nourishing hand cream, and your nails will be ready for their next reflective set within a day or two. Frequent wearers should invest in reusable silicone nail caps, which hold acetone-soaked cotton securely without messy foil.

Cost: What to Expect
Reflective gel manicures sit in the mid-range of nail service pricing. At a salon, expect to pay roughly thirty to sixty dollars for a full set, with simple designs at the lower end and intricate art pushing the price higher. Premium reflective shades from sought-after brands may add a small surcharge, but most salons include them in standard gel pricing.
The DIY route requires an upfront kit investment of around fifty to one hundred dollars for a lamp, prep tools, and a few polishes, but each subsequent manicure costs only a few dollars in product. Given that a well-done reflective set lasts two to three weeks, the per-wear cost is quite reasonable either way. For the trend-obsessed, building a small at-home collection quickly pays for itself within a few months. Watch for seasonal salon promotions, since many offer discounted glitter and reflective upgrades during the holiday party season.

Styling Outfits with Reflective Nails
Reflective nails are surprisingly versatile as a style accessory because their daytime subtlety lets them pair with almost anything. Silver and champagne shades act like jewelry, complementing both casual denim and formal evening wear. Darker reflective shades function as a statement piece, best balanced with simpler outfits that let the nails take focus.
Coordinate rather than match exactly: pick up an undertone from your outfit in your nail shade, or contrast deliberately, like icy silver nails against an all-black ensemble. Metallic accessories, from rings to clutches, echo the reflective finish beautifully. The golden rule is that your nails should feel like part of the outfit’s story, and reflective polish makes that easy, shifting its mood with the lighting just as your day shifts from work to evening. When photographing your manicure, shoot near a window for daylight shots and switch on flash for the dramatic reveal image.

Leave a Reply