
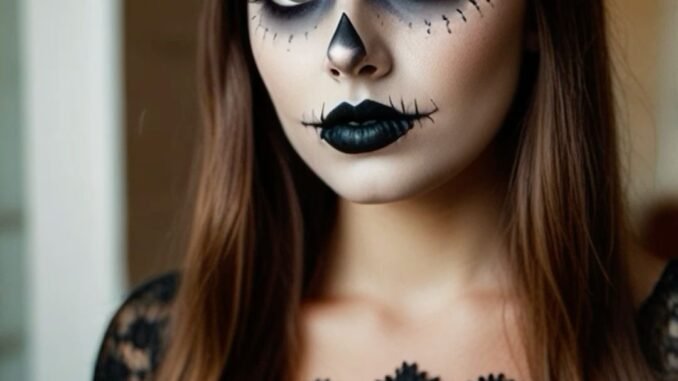
Of all the Halloween makeup looks that come back every October, skeleton face paint is the undisputed champion. It works for every age and every skill level, it needs nothing more than black and white makeup, and it never looks out of place, whether you are trick-or-treating with kids, heading to a costume party, or handing out candy at the door. This guide covers everything from the basic skull every beginner can paint to glam, gory, and kid-friendly variations, with step-by-step techniques for eyes, nose, teeth, and shading that make the difference between a smudged face and a stunning skeleton.
What Is Skeleton Face Paint?

Skeleton face paint is makeup artistry that transforms the human face into a skull, using dark shading to hollow the eyes, nose, and cheeks and light base makeup to mimic bone. At its simplest it is a white face with black eye sockets, nose, and stitched mouth; at its most advanced it is a full illusion extending down the neck and chest, complete with vertebrae, ribs, cracks, and shadows. The look belongs to a long tradition of skull imagery, from Day of the Dead calaveras to classic horror, and it reads instantly in any crowd.
What makes skeleton makeup special is its versatility. The same basic technique adapts to cute, creepy, glamorous, or gory simply by changing the details: add flowers and it leans sugar skull, add rhinestones and it turns glam, add fake wounds and it becomes horror. It suits every face shape and skin tone because the skull underneath is universal. Once you learn the core mapping of where the bones go, you can improvise endless variations with confidence.
Why Skeleton Makeup Is a Halloween Classic

Skeleton makeup endures because it solves Halloween’s hardest problem: looking amazing without a complicated costume. A black outfit plus a painted skull is a complete, unmistakable costume that takes an hour or less and costs almost nothing. It is gender-neutral, age-flexible, and endlessly customizable, which is why you see it on toddlers, teens, and grandparents alike every October 31.
There is also a deeper reason the skull never goes out of style. It is one of humanity’s oldest symbols, appearing in art across every culture, and it carries a thrill that cute costumes cannot match: the delicious shiver of confronting mortality from a safe distance. Social media keeps reinventing it, with artists posting increasingly creative takes each year, from neon skeletons to half-skull optical illusions. The classic endures because every generation makes it their own.
Essential Products and Tools

You need less than you think to paint a great skeleton. The non-negotiables are a white base, either cream face paint, white foundation, or a greasepaint stick, and a true black, in cream, gel, or pencil form for lines and shading. Add a gray or brown eyeshadow for soft shading, a setting powder or spray to lock everything in place, and makeup remover or micellar water for the end of the night. That is genuinely enough for a classic skull.
For upgraded results, gather a few extras: an angled eyeliner brush for crisp teeth lines, a fluffy blending brush for hollowing the cheeks, a fine detail brush for cracks, black eyeliner pencil for precision work around the eyes, and optional extras like rhinestones, lash glue, glitter, or fake blood depending on your chosen style. Work on a clean, moisturized face, tie hair back, and lay out your tools before you start. Good lighting, ideally daylight or a bright ring light, matters more than expensive products.
Prepping Your Skin for Face Paint

Great skeleton makeup starts before the first brushstroke. Cleanse your face thoroughly, then apply a light, oil-free moisturizer and let it absorb for a few minutes; paint grips better on hydrated skin and removes far more easily later. If you have sensitive skin, do a patch test with your face paints a day ahead, especially with inexpensive brands, and consider a thin layer of primer to create a barrier between paint and pores.
Protect everything the paint should not touch. Pull hair back and cover the hairline with a headband, since white base near the hairline is notoriously hard to wash out. Wear an old shirt or drape a towel over your clothes, and keep makeup remover wipes within arm’s reach for correcting mistakes as you go. If you wear contact lenses, put them in before painting. Ten minutes of prep saves an hour of frustration and keeps your skin happy under hours of makeup.
The Classic Black-and-White Skull

The classic black-and-white skull is the foundation of all skeleton makeup, and mastering it first makes every variation easier. Start by covering the face in white base, leaving the eye area for later, and set it lightly with translucent powder. Then, using black cream paint or gel liner, fill in large rounded eye sockets, paint an upside-down heart or triangle on the nose, hollow the cheeks with sweeping strokes from ear toward mouth, and draw the stitched mouth: a horizontal line across the lips with short vertical ticks.
The secret to a polished result is edges. Soft, blended edges look like shading; harsh, unblended edges look like mistakes. Use a clean fluffy brush to soften the borders of every black shape, and keep a cotton swab dipped in remover handy to sharpen lines. Step back from the mirror frequently, the skull should read clearly at arm’s length, not just inches away. Nail this classic and you have a look that works for any Halloween event, every single year.
Mapping the Skull: Where the Bones Go

The difference between a face with black shapes and a convincing skull is anatomy. Before painting, study your own bone structure: the eye sockets sit in the hollows beneath the brow bone, the nose cavity centers on the tip of the nose, the cheekbones arc from ear to the corner of the mouth, and the jawline defines the skull’s lower edge. Skeleton makeup works by darkening the hollows and lightening the high points, exaggerating what is already there.
A useful trick is to look at a real skull image side by side with your mirror while you paint, placing each feature where the bone actually sits rather than where it feels intuitive. Children are the easiest canvas because their small faces need only simplified shapes: big eye sockets, a triangle nose, and a stitched smile read instantly as a skull. Adults can push further with temples, jaw shading, and neck vertebrae. When the mapping is right, even rough painting looks convincing, because the brain recognizes the skull pattern.
The Hollow Eyes Technique

Hollow eyes are the soul of the skeleton look, and the technique is all about shape and blending. Paint a large rounded shape covering the entire eye area, extending from beneath the brow down to the top of the cheekbone and out toward the temple. Fill it solidly with black, then soften only the outer edge with gray shadow so the socket appears to recede into the skull. The bigger and rounder the socket, the more skull-like the result.
For extra depth, add a smaller, darker core of pure black at the center and a ring of dark brown or gray around it, mimicking how a real socket shadows. Keep black paint from migrating into the eye itself by working with a light hand near the lash line and setting the area with powder. Dramatic false lashes or heavy black eyeliner on your real eyes, visible within the painted socket, create a striking focal point that makes the whole skull come alive.
Nose and Cheekbone Contouring

The nose and cheekbones give the skull its structure, and both rely on the same principle: dark recedes, light advances. For the nose, paint an inverted heart or rounded triangle over the tip and nostrils, then blend the edges so it looks carved rather than drawn on. A tiny highlight of white down the bridge of the nose above the black shape adds dimension and keeps the feature from looking flat.
Cheek hollowing is where most beginners underdo it. Sweep dark shadow or black paint in a curved band from the ear toward the corner of the mouth, following the natural hollow beneath your cheekbone, and blend thoroughly. The contrast between the darkened hollow and the whitened cheekbone above is what creates the gaunt, skeletal look. Build the color gradually in layers; you can always add more darkness, but removing it smudges the white base. Check your work in profile, the contour should look natural from the side too.
Teeth and Jaw Details

Teeth separate a good skeleton from a great one. The classic approach is the stitched or skeletal grin: extend a black horizontal line from each corner of the mouth toward the ears, then add short vertical lines crossing it to suggest individual teeth. For a more realistic skull mouth, whiten the lips completely, then draw the teeth as a row of small rectangles with thin black dividers, curving the row to follow your lip shape.
Precision matters most here because the mouth is the face’s focal point. Use a fine brush or a sharpened black lip pencil, rest your elbow on a table for steadiness, and work slowly. Extend the shading slightly below the lower lip and along the jawline to suggest the mandible, blending downward so the skull seems to continue past the chin. If you plan to eat or drink, keep the mouth design simple and set it heavily with powder; elaborate teeth smudge fast around the lips.
Cracks and Shading for Realism

Cracks and fine shading are the details that make viewers do a double take. A single thin crack running across the forehead or cheek, painted with a fine brush in dark gray with a lighter highlight along one edge, instantly suggests aged bone. Add a few smaller branching cracks and subtle mottling with a stipple sponge, and the skull gains the texture of something excavated rather than painted.
Shading ties everything together. Lightly darken the temples, the sides of the forehead, and under the jawline with gray or brown to round the skull in three dimensions, and add white highlights on the brow bone, cheekbones, and chin where bone would catch light. The key is restraint: these details should whisper, not shout. Step back often, because cracks that look perfect up close can look messy from across the room, and skeleton makeup is always viewed at a distance.
Glam Skeleton: Rhinestones and Glitter

Who says skeletons cannot sparkle? The glam skeleton keeps the classic skull structure but finishes it with rhinestones, glitter, metallic accents, and dramatic lashes for a look that is equal parts spooky and stunning. It is the perfect choice when you want Halloween spirit without sacrificing style, and it photographs beautifully under party lights.
Build the look on a flawless classic skull base, then embellish strategically: place rhinestones along the brow bone, at the inner eye corners, or tracing the cheekbone hollows, using eyelash glue applied with tweezers. Add fine cosmetic glitter over the black areas with a glitter adhesive, never craft glitter near the eyes. A spiderweb design on the forehead, metallic silver instead of flat white, or a bold dark lip elevates the glam factor further. Set everything generously; rhinestones stay put all night when glued properly, but test the glue on your skin first.
Sugar Skull vs. Skeleton: Key Differences

Skeleton face paint and sugar skull makeup are often confused, but they come from different traditions and follow different rules. The classic skeleton is about realism and spookiness: monochrome black and white, hollowed features, anatomical shading, rooted in Halloween horror. The sugar skull, or calavera, comes from Día de los Muertos and celebrates death joyfully with vibrant colors, flowers, hearts, and decorative patterns around the eyes.
Knowing the difference matters, especially since the sugar skull is a meaningful cultural symbol, not just a pretty design. If you paint a sugar skull, take time to understand what it represents and wear it with respect for the tradition, ideally around Día de los Muertos rather than as generic Halloween decor. If you want spooky, stick with the monochrome skeleton. Both are beautiful; the key is choosing intentionally and honoring the culture behind the calavera.
Half-Skull, Half-Glam Looks

The half-skull is social media’s favorite skeleton variation: one side of the face painted as a detailed skull, the other left as glamorous makeup, with a dramatic dividing line down the center. The contrast is visually arresting and shows off both your artistry and your everyday makeup skills in a single look. It is also practical, requiring only half the face-painting time of a full skull.
Execution hinges on the center line. Use a ruler or the edge of a card to map a straight vertical line down the middle of the face, then paint the skull side first, keeping every shape crisp right up to the boundary. On the glam side, go bold: smoky eyes, red lips, contoured cheeks, since it needs to hold its own against the dramatic skull. Blend the dividing line slightly or embellish it with rhinestones for a finished edge. Photograph it straight-on for maximum impact.
Skeleton Face Paint for Kids

Kids adore skeleton face paint, and the simplified version is quick, comfortable, and parent-friendly. Use hypoallergenic, water-based face paints made for children, keep the design simple, big eye sockets, triangle nose, stitched smile, and skip heavy white coverage if your child dislikes the feeling; black features on bare skin still read clearly as a skeleton and are far more comfortable for hours of trick-or-treating.
Speed and comfort are everything with young models. Work in short sessions, let them hold a mirror so they feel involved, and promise the fun reveal at the end. Avoid painting too close to the eyes if they are squirmy, and keep wipes handy for itches. For very young children, consider a skeleton mask or a painted headband instead of full face paint. The goal is a happy kid who keeps the look on all night, not a perfect skull that gets rubbed off in ten minutes.
Simple Skeleton Makeup for Beginners

If you have never painted a skull before, start with the five-minute skeleton: it needs only black eyeliner and eyeshadow, no white base required. Smudge black shadow generously around both eyes, draw a small black triangle on the nose tip, sketch hollowed cheeks with brown shadow, and finish with the classic stitched mouth using liquid liner. It is forgiving, fast, and surprisingly effective in dim party lighting.
The beginner’s biggest advantage is low stakes, so practice on the back of your hand or on paper first to get comfortable with the shapes. Watch one video tutorial all the way through before starting, then follow along pausing as needed. Common beginner wins: bigger eye sockets than you think, blending the edges of every shape, and stepping back to check symmetry. Your first skull will not be perfect, and it does not need to be; Halloween lighting and enthusiasm cover a multitude of sins.
Easy Stitched Skeleton Looks

The stitched mouth is the skeleton’s signature detail, and a whole look can be built around it with minimal effort. After a light white or natural base, draw the extended smile line from cheek to cheek, add the vertical ticks for teeth, and keep the rest of the face simple: softly hollowed eyes, a hint of nose shading, lightly contoured cheeks. The result is eerie and elegant without the heaviness of a full skull.
This style is ideal when you want to eat, drink, and talk comfortably all night, since the simple mouth design survives better than elaborate teeth. It also pairs beautifully with costumes: the stitched skeleton complements everything from a Victorian ghost to a scarecrow. For extra effect, extend small stitch lines from the mouth corners upward or add a few faux stitches across the forehead with liquid liner. Understated, creepy, and endlessly wearable.
Advanced Full-Body Skeleton Art

Ready to go beyond the face? Advanced skeleton art extends the illusion down the neck, across the shoulders, and over the torso, painting vertebrae, collarbones, ribs, and even a full ribcage. This is the showstopper look of costume contests and professional shoots, and while it takes hours, the transformation is genuinely astonishing.
Plan this look carefully: sketch the design first, work from the face downward, and use reference images of real skeletons for the body portion. Cream paints or airbrush makeup cover large areas fastest; set each section with powder before moving on so you do not smudge finished work. Recruit a helper for your back and shoulders, wear minimal clothing you do not mind staining, and allow at least three hours. Photograph the result in good light before the party, these masterpieces deserve documentation.
Skeleton Makeup for Different Skin Tones

Skeleton makeup flatters every skin tone, but the technique shifts slightly with deeper complexions. On rich brown and dark skin, the classic white base can look ashy or require heavy layering; instead, many artists skip the full white base and build the skull from shading alone, using deep blacks, dark browns, and grays to hollow the features, with white or silver used sparingly as highlight on the high points of the face.
This negative-space approach is not a compromise, it is often more striking and more comfortable than full coverage, and it photographs beautifully. On medium skin tones, a sheer white base or a mix of white with your foundation shade keeps the skull bright without masking your natural warmth. Whatever your tone, the principles are identical: darken the hollows, lighten the bones, and blend. Test your product combination in daylight before the event to make sure the contrast reads the way you want.
Setting Your Makeup to Last All Night

Nothing ruins skeleton makeup faster than smudging an hour into the night. Setting is the unglamorous step that makes everything else worthwhile. After completing the design, press translucent setting powder over the entire face with a large fluffy brush, focusing on the black areas, which transfer most. Follow with a generous mist of setting spray, let it dry, and repeat for a bulletproof finish.
Strategic choices extend wear further. Cream and grease paints last longer than water-activated ones but need more powder; waterproof eyeliners survive tears and sweat around the eyes. Avoid touching your face, carry blotting papers instead of powder for touch-ups, and keep a small kit, black pencil, cotton swabs, mini setting spray, for repairs. With proper setting, a well-painted skeleton easily survives a full evening of parties, photos, and dancing.
Sugar Skull or Skeleton? Avoiding the Mix-Up

One of the most common Halloween makeup mistakes is accidentally drifting between skeleton and sugar skull, ending up with a look that is neither. The fix is deciding before you pick up a brush: spooky monochrome skull or colorful celebratory calavera? If skeleton, commit to black, white, and gray only, no flowers, no bright colors, no decorative swirls. If sugar skull, embrace the color and symmetry the tradition calls for, and learn what the symbols mean.
Other mistakes to avoid: eye sockets too small to read as a skull, unblended harsh edges, skipping the neck (a floating white face looks unfinished), and using craft glitter near the eyes. Photograph your finished look in the lighting you will actually be in; bathroom lighting lies. And remember the golden rule of skeleton makeup: bolder is better. Timid, tiny features disappear at party distance, while confident, oversized shapes read perfectly across a crowded room.
Leave a Reply