
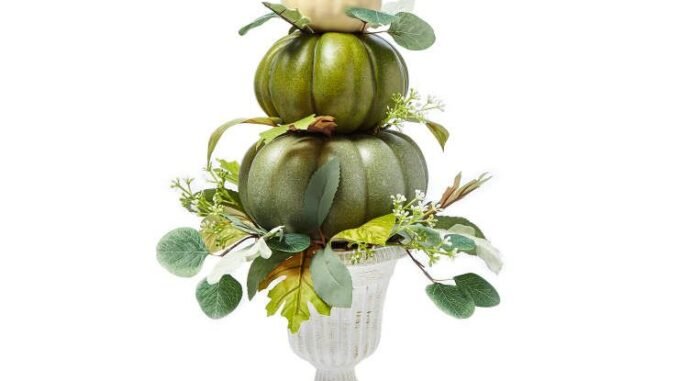
There is a reason pumpkin topiaries keep showing up on porches, mantels, and dining tables every single fall. They take the most familiar symbol of the season and give it structure, height, and polish. A pumpkin topiary is exactly what it sounds like: pumpkins stacked, arranged, and decorated in the tiered shape of a classic garden topiary, often set in an urn or planter and finished with moss, greenery, and fall florals. The result looks far more expensive and intentional than a loose pile of pumpkins ever could. This guide walks through everything you need to build your own, from choosing the right pumpkins to styling them for the porch, the table, and beyond.
What Is a Pumpkin Topiary?

A pumpkin topiary is a decorative arrangement in which pumpkins are stacked in graduated sizes, largest at the bottom and smallest at the top, to mimic the silhouette of a traditional clipped topiary tree. Most are built in or on top of a container, such as an urn, planter, crock, or pedestal, and the gaps between pumpkins are tucked with moss, eucalyptus, berries, or fall leaves. The finished piece has the presence of a small tree and the warmth of classic autumn decor.
The appeal is partly visual and partly practical. Visually, the tiered shape draws the eye upward and gives a porch or room a clear focal point, something a scattered pumpkin display cannot do. Practically, topiaries are easy to customize: change the pumpkin colors, the container, or the filler, and the same basic build reads as rustic farmhouse, elegant traditional, or playful Halloween. Once you understand the simple stacking principle, you can scale the idea from a tiny tabletop version to a grand front-door statement.
Why Pumpkin Topiaries Are Trending This Fall

Pumpkin topiaries are trending because they solve a common decorating problem: how to make fall decor look finished rather than random. A few pumpkins by the door are nice, but a topiary looks designed. Social media has amplified the trend, with creators sharing everything from five-minute faux versions to elaborate painted showpieces, and each iteration makes the idea feel more achievable. The look also photographs beautifully, which keeps it circulating on Pinterest season after season.
There is a budget angle too. A striking topiary can be built from inexpensive craft-store pumpkins, a thrifted urn, and a bag of moss, yet it reads as a high-end seasonal arrangement. For people who love to refresh their decor each year without spending much, the topiary is ideal: keep the container and the faux pumpkins, and simply swap the ribbon, florals, or paint colors. It is a rare project that is simultaneously on-trend, affordable, and reusable.
The Best Pumpkins for Topiary Projects

Choosing pumpkins for a topiary is different from choosing a carving pumpkin. You want firm, unblemished pumpkins with flat, stable bottoms and strong stems, because each one needs to sit securely on the one below it. Look for a graduated set: a large, wide pumpkin for the base, a medium one for the middle, and a small, round one for the top. Squat, slightly flattened varieties stack far better than tall, tippy ones.
Color matters as much as shape. Classic orange gives a traditional harvest feel, while white, green, and blue-gray heirloom varieties create an elegant, modern look. Mixing colors within one topiary adds visual interest, but keep the palette to two or three tones so the arrangement stays cohesive. Whatever you choose, inspect each pumpkin for soft spots, and give them a quick wipe with a damp cloth before building so dust does not dull the finish.
Real vs. Faux Pumpkins: Which Should You Use?

Both real and faux pumpkins make excellent topiaries, and the right choice depends on where the arrangement will live and how long you need it to last. Real pumpkins bring authentic color, texture, and that unmistakable fall scent, and they are inexpensive at the peak of the season. The trade-off is lifespan: even uncarved, real pumpkins eventually soften, especially in warm or wet weather, so a real-pumpkin topiary is best for a display you will enjoy for a few weeks.
Faux pumpkins, made from foam or plastic, cost more up front but last for years and can be painted any color you like, from classic orange to chalky white, metallic gold, or blush pink. They are also lighter, which makes tall stacks more stable, and they never rot on the porch. Many decorators use a hybrid approach: faux pumpkins for the structure and a few real mini pumpkins or gourds tucked in as accents. If you love to redecorate every year, faux is the practical winner.
Tools and Supplies You’ll Need

You do not need a craft room full of equipment to build a pumpkin topiary. The essentials are pumpkins in graduated sizes, a sturdy container such as an urn, planter, or crock, and something to stabilize the stack: a wooden dowel, a metal rod, or a foam cone for mini-pumpkin versions. A bag of Spanish moss or sheet moss hides the mechanics and gives the finished piece a lush, professional look.
Beyond the basics, gather what you need for your chosen style. Hot glue or floral picks secure moss and small accents. Fall leaves, berry sprigs, eucalyptus, and mini pinecones fill gaps beautifully. If you plan to paint, pick up acrylic or chalk paint plus a sealant. A pair of garden snips helps trim stems and filler to size. Lay everything out before you start, and the actual assembly takes less than an hour for most designs.
The Classic Three-Tier Pumpkin Topiary

The classic three-tier topiary is the foundation every other version builds on. Start with your container: fill an urn or planter with floral foam, crumpled newspaper, or a brick, then push a sturdy dowel or rod through the center. Thread your largest pumpkin onto the rod first, seating it firmly in the container, then add the medium pumpkin, and finish with the smallest on top. The rod keeps the whole stack from toppling in wind or when bumped.
Once the pumpkins are stacked, the magic is in the finishing. Tuck moss around the base of each pumpkin where it meets the next, hiding any gaps and giving the stack a seamless, grown-together look. Add berry sprigs, small leaves, or mini pinecones at each tier for color and texture. Step back and check the silhouette from several angles; a great topiary looks balanced from the front, the sides, and slightly above.
Pumpkin Topiary in Urns and Planters

The container you choose sets the tone for the entire topiary. A weathered stone or cast-iron urn gives a formal, estate-garden feel, while a galvanized bucket, wooden crate, or terracotta pot leans rustic and casual. Whatever you use, make sure it is heavy enough to anchor the arrangement or can be weighted with stones, sand, or bricks at the bottom. A top-heavy topiary in a light container will tip at the first gust of wind.
Scale matters too. The container should look substantial next to the pumpkins, roughly one-third the total height of the finished piece is a good rule of thumb. For a grand look, use an oversized urn that lets the pumpkins sit down inside the rim; for a sleeker profile, perch the stack on a tall, narrow pedestal. If your favorite planter is too light, hide a bag of gravel inside before adding foam or filler, and nobody will ever know.
Mini Pumpkin Topiary Centerpieces

Not every topiary needs to guard the front door. Mini versions built from small pie pumpkins, mini white pumpkins, or even gourds make charming table centerpieces, and they are the perfect starter project if you have never built one before. Use small crocks, teacups, mason jars, or tiny terracotta pots as the base, and stack two or three mini pumpkins with a dab of hot glue or a short wooden skewer for stability.
The small scale invites detail. Wrap the base in twine, tuck in a sprig of dried lavender or wheat, or add a tiny tag with a handwritten message for a dinner party. A row of mini topiaries down the center of a table looks far more impressive than the effort suggests, and guests can take them home as favors. Because the pumpkins are small, you can experiment with unusual colors, like ghostly white or dusty blue, without committing to a large display.
White and Heirloom Pumpkin Topiaries

White and heirloom pumpkins have quietly taken over fall decorating, and they are spectacular in topiary form. Varieties like Baby Boo, Casper, Lumina, and the blue-gray Jarrahdale bring a sophisticated, almost bridal palette to a season dominated by orange. An all-white topiary in a dark urn is strikingly elegant, while a mix of cream, sage, and pale peach heirloom pumpkins feels soft and modern.
Heirloom pumpkins often have deeply ribbed or warty textures that add interest even without extra decoration, so you can keep the filler minimal: a little eucalyptus or silver-dollar greenery is enough. One caution is that white pumpkins show dirt and bruises more readily than orange ones, so handle them gently and wipe them clean before stacking. The payoff is a topiary that looks custom-designed rather than store-bought.
Adding Greenery: Moss, Eucalyptus, and Leaves

Greenery is what separates a stack of pumpkins from a true topiary. Moss is the workhorse: Spanish moss drapes softly over edges, while sheet moss creates a lush, carpeted look around the base and between tiers. Both hide hot glue, foam, and dowels, and both make the pumpkins look as though they are growing out of the arrangement rather than simply piled up.
Eucalyptus is the other essential, especially the round silver-dollar variety, whose cool gray-green tone flatters both orange and white pumpkins. Tuck sprigs between tiers so they spill outward, and add a few stems of dried wheat, preserved oak leaves, or seeded branches for height and texture. If you are using real pumpkins outdoors, choose hardy, weather-tolerant greenery, and mist the moss occasionally so it stays fresh-looking through the season.
Fall Florals and Berries for Extra Color

Once the pumpkins are stacked, fall florals and berries are what make a topiary feel abundant and finished. Sunflowers are a natural partner: their golden faces echo the pumpkin tones and their size holds its own against large gourds. Mums, dahlias, and marigolds in deep reds, rusts, and burgundies add richness, while hypericum berries, bittersweet, and artificial cranberry sprigs contribute jewel-like pops of color.
Work the florals in at the tier junctions, where the eye naturally rests, and let a few stems trail downward for movement. If you are using fresh flowers, insert them in small water tubes hidden in the moss so they last for days; for a longer-lived display, high-quality silk florals are indistinguishable at porch distance. A good rule is to repeat each floral color at least twice around the arrangement so the color story feels deliberate rather than scattered.
Pumpkin Topiary for the Front Porch

The front porch is the pumpkin topiary’s natural habitat, and a well-placed one sets the tone for your whole exterior. Position the topiary where it gets noticed but not battered: beside the door, at the top of the steps, or flanking a bench. Make sure it does not block the walkway or the door swing, and if your porch is exposed, anchor the container well and consider a shorter, wider stack that resists wind.
Coordinate the topiary with the rest of your porch for a pulled-together look. Echo its colors in a wreath on the door, a striped runner, or planters of mums, and repeat one accent, such as buffalo check ribbon or galvanized metal, in two or three places. Evening curb appeal matters too: a nearby lantern or a strand of warm fairy lights makes the topiary glow after dark and welcomes visitors long after sunset.
Flanking the Front Door: Symmetrical Pairs

One topiary makes a statement; a matching pair makes an entrance. Symmetrical topiaries flanking a front door create instant formality and balance, the same trick landscape designers use with boxwood cones and urns. The key is true symmetry: use containers of the same size, pumpkins in similar sizes and colors, and mirror the filler and accents on both sides as closely as you can.
Pairs work especially well with narrower designs, since two wide topiaries can crowd a standard doorway. Tall, slim stacks on pedestals or in matching urns frame the door without overwhelming it. If building two identical topiaries feels like too much, build one full version and a simplified echo: same container and pumpkin colors, but with less filler. From the street, the pair will still read as a matched set.
Tabletop Pumpkin Topiaries for the Dining Room

A pumpkin topiary scaled for the dining table turns everyday fall meals into occasions. Keep the total height under about eighteen inches so guests can see over it, and choose a stable, wide-based container that will not wobble when the table is bumped. Two tiers are usually plenty at this scale; three small pumpkins can start to look precarious and block conversation.
Style the tabletop topiary to echo your table setting. A white pumpkin version pairs beautifully with neutral linens and gold flatware, while a classic orange stack suits a rustic table with plaid napkins. Add a few loose leaves, acorns, or votive candles around the base to extend the arrangement across the table. Because it is indoors and closely viewed, this is the place to use your prettiest pumpkins and your tidiest moss work.
Mantel and Entryway Displays

The mantel is prime real estate for a pumpkin topiary, and the long, horizontal surface invites creative arrangements. A single topiary placed off-center, balanced by candlesticks or a garland on the other side, creates pleasing asymmetry. Alternatively, a trio of small topiaries in graduated heights marching across the mantel looks intentional and rhythmic.
Entryway consoles and foyer tables follow the same principles on a smaller footprint. Here, a slim topiary in a tall container adds height without eating up surface space you need for keys and mail. Tie the display to the season with a simple garland of fall leaves along the mantel edge or a stack of coffee-table books beneath the arrangement. Since these spots are seen up close, take extra care with the finishing: neat moss, no visible glue, and pumpkins wiped clean.
Glitter and Metallic Pumpkin Topiaries

For a topiary with evening glamour, go metallic. Gold, champagne, copper, and bronze pumpkins catch candlelight and porch lights beautifully, and a glitter finish adds sparkle that reads festive without tipping into gaudy, as long as you keep the palette tight. A topiary of all-gold pumpkins in a dark urn, for example, looks luxurious against both traditional and modern exteriors.
Creating the finish is simple: spray faux pumpkins with metallic spray paint in light, even coats, or brush on craft glue and roll real mini pumpkins in fine glitter for a jeweled effect. Always work in a ventilated area and let each coat dry fully before handling. Pair metallic pumpkins with deep, moody filler like blackberries, dark dahlias, or black moss for contrast, and the result is a topiary that transitions effortlessly from fall into holiday-season decor.
Painted Pumpkin Topiaries: Chalk, Stripes, and Dots

Painting opens up endless topiary possibilities beyond what nature provides. Chalk paint gives pumpkins a soft, matte, farmhouse finish in any color from French gray to sage green; acrylics allow crisp stripes, dots, and patterns; and a black-and-white palette with gold accents creates a chic Halloween look that is more stylish than spooky. Because you control the color, you can match the topiary exactly to your existing decor.
The technique matters as much as the color. Clean and dry the pumpkins first, apply thin coats to avoid drips, and seal with a clear matte sealer if the topiary will live outdoors. Simple patterns often look best: ticking stripes, polka dots, or a single monogram on the middle pumpkin. Paint the pumpkins before stacking so every side is covered, and touch up any scuffs after assembly. A painted topiary is also the easiest to refresh next year with a new color scheme.
Pink Pumpkin Topiary Ideas

Pink pumpkins have become a beloved fall trend, partly because pink pumpkin displays support breast cancer awareness each October. In topiary form, blush pink, dusty rose, and soft coral pumpkins create a romantic, unexpected twist on autumn decor that stands out beautifully against traditional orange surroundings. They work especially well for baby showers, bridal showers, and girls’ bedroom decor during the fall months.
Build a pink topiary the same way as any other, but choose filler that complements rather than competes: cream roses, dusty miller, pale eucalyptus, and ivory berries all flatter pink pumpkins. A white or light-gray container keeps the look airy, while a touch of gold ribbon adds warmth. Mix in a few white pumpkins to keep the pink from feeling one-note, and the result is a topiary that feels fresh, feminine, and thoroughly modern.
Kid-Friendly No-Carve Pumpkin Topiary Ideas

Topiaries are a perfect no-carve pumpkin project for kids because there are no knives involved, only stacking, gluing, and decorating. Let children pick the pumpkins, choose the ribbon colors, and place the filler, while an adult handles any hot glue or dowels. Whimsical additions like googly eyes, felt hats, pipe-cleaner arms, or a friendly owl figure turn the topiary into a character kids will love.
Keep the design sturdy and simple: two tiers are plenty for little hands, and a wide, heavy container prevents tip-overs. Use washable craft paint or stickers instead of permanent markers so mistakes are fixable, and let each child build a mini topiary of their own in a small pot. The finished creations make sweet gifts for grandparents and teachers, and the whole project takes less time than carving a single jack-o-lantern.
How to Keep Your Pumpkin Topiary Fresh Longer

A real-pumpkin topiary can look great for weeks with a little care. Start with the freshest pumpkins you can find, choosing ones with intact stems and no soft spots, and wipe them down with a diluted vinegar solution to discourage mold. Keep the arrangement out of direct afternoon sun and off hot concrete, both of which accelerate decay, and shelter it from heavy rain if possible.
Check the stack every few days and remove any filler that is trapping moisture against the pumpkin skin. If one pumpkin starts to soften, replace just that tier rather than rebuilding the whole thing, which is easy if you built on a central dowel. When the season ends, compost real pumpkins and store faux ones in a cool, dry place, ideally wrapped so painted finishes do not scratch. With good care, a well-built topiary will carry your porch from early fall right through Thanksgiving.
Leave a Reply