
Christmas Crafts for Kids
Christmas crafting with kids is one of the happiest ways to spend December, turning ordinary paper plates, cotton balls, and popsicle sticks into decorations full of personality. The projects in this guide are chosen for real families: they use inexpensive supplies, suit a wide range of ages, and finish in a single sitting without complicated tools. Some become treasured keepsakes, like handprint ornaments that capture how small little hands once were, while others are pure play, like paper snowflakes scattered across windows. Work at your child’s pace, protect the table, and let imperfect results shine, because a slightly crooked Santa or a lopsided reindeer is exactly what makes handmade Christmas decorations so lovable and memorable year after year. Gather the basics in a box before you begin, so little makers can start creating the moment inspiration strikes.
Paper Plate Santa Claus
Start with a plain white paper plate, and let your child turn it into Santa’s smiling face. Paint the top third red for his hat, or glue on a red paper triangle, then add a white cotton ball trim along the edge. Cut two small black circles for eyes, a round pink or red nose, and a fluffy white beard made from cotton balls or torn tissue paper. Younger children can simply glue pre-cut shapes, while older kids can draw details, add rosy cheeks, and write a message on the back. This craft builds scissor skills, color recognition, and patience, and it uses supplies most families already own. Display the finished Santas on a wall, hang them from ribbon, or tape one to each bedroom door for a cheerful countdown to Christmas morning. Keep the finished Santa somewhere visible, because children beam with pride every time they spot their own creation greeting visitors at the door. A simple red ribbon loop turns the plate into a hanging decoration in seconds.

Handprint Reindeer Ornaments
Paint your child’s hand brown, press it firmly onto thick card, and watch a reindeer appear as if by magic. The fingers become antlers, the palm becomes the face, and a bright red pom-pom makes the perfect Rudolph nose. Add googly eyes, a small ribbon loop for hanging, and the year written neatly on the back so the keepsake stays meaningful. Laminating the finished ornament protects the paint and lets it survive many Christmases on the tree. Children love seeing their own hand shape turned into a character, and grandparents treasure these ornaments because they capture a moment in time. Make one for every family member, and compare hand sizes year after year. Date each ornament on the back, and store it in tissue paper so future Christmases bring back happy memories of tiny hands and busy afternoons. A tiny bell tied to the ribbon adds a cheerful jingle whenever the tree is touched.

Popsicle Stick Window Ornaments
Glue red popsicle sticks into a small window frame, add a snowy cotton trim, and slip a favorite photo behind the panes for a personal ornament. Children can paint the sticks, sprinkle on fake snow, and tie a striped string loop for hanging. A tiny wreath made from green pipe cleaners and a red bow finishes the design beautifully. This project teaches measuring, gluing, and planning, because the frame must be square before the decorations go on. It also makes a thoughtful gift, since the photo turns a simple craft into a keepsake. Hang several windows together on the tree, or give one to each grandparent with a school photo tucked inside. A second window frame makes an easy matching gift for another special relative. Let children choose their own photo and ribbon color, since personal choices make them far more invested in finishing the project carefully and proudly.

Salt Dough Christmas Ornaments
Mix flour, salt, and water into a soft dough, roll it flat, and let children cut stars, trees, stockings, and snowflakes with cookie cutters. Poke a hole near the top with a straw before baking, so a ribbon can be threaded through later. Once the shapes are cool and hard, paint them in bright Christmas colors, add glitter while the paint is wet, and seal with clear varnish for a lasting finish. Salt dough is inexpensive, safe to handle, and forgiving for small hands that press too hard or roll unevenly. These ornaments look wonderful on the tree, make lovely gift tags, and can be stored carefully and reused for many holiday seasons. Painted ornaments also make charming additions to wrapped presents as reusable gift tags. Store leftover dough in a sealed bag for another day, and remind children to wash hands before painting so their bright colors stay clean and vivid.

Paper Plate Christmas Trees
Cut a paper plate into a circle scene, then build a three-dimensional tree from folded green paper and glue it in the center. Add a yellow paper star on top, a brown trunk, and white cotton snow at the base for a complete winter picture. Children can decorate the tree with tiny stickers, sequins, or hand-drawn baubles, and each tree will look completely different. This craft is ideal for preschoolers because the plate gives a clear boundary, while older children can experiment with layers, patterns, and shading. Hang the finished plates in a row to create a little paper forest, or stand them on a shelf as cheerful table decorations. Encourage children to sign and date the back of the plate, turning a simple afternoon craft into a keepsake you can compare with next year’s version. This simple project works beautifully for classrooms, playdates, and cozy family afternoons.

Handprint Santa Christmas Cards
Fold a sheet of brown or white card in half, then paint a small hand white and red to create Santa’s beard, hat, and face. Press the handprint onto the front, let it dry completely, and add googly eyes plus a red pom-pom nose for personality. Inside, children can write a short message, draw a tiny tree, or stamp a festive greeting for the recipient. These cards feel far more personal than shop-bought ones, and relatives often keep them long after the holidays end. The project is quick enough for a classroom, yet special enough for grandparents, teachers, and neighbors who will smile when Santa’s handprint face arrives in the mail. Add a sprinkle of glitter around the handprint once the paint dries, and let the card dry flat overnight so the design stays crisp and smudge-free. Keep spare paper, glue, and glitter nearby so children can happily make another one.

Toilet Paper Roll Snowmen
Save empty toilet paper rolls, wrap them in white paper, and transform them into jolly snowmen with black paper hats and orange carrot noses. Add googly eyes, draw a dotted smile, glue on brown pipe-cleaner arms, and finish with buttons down the front. Children can make a whole snowman family in different sizes, dress them with scarves cut from felt scraps, and arrange them on a windowsill winter scene. This craft teaches recycling in a fun way, because a household item becomes a toy and decoration. It is sturdy enough for play, simple enough for toddlers with help, and charming enough to display throughout December and January. Line up the finished snowmen on a windowsill with cotton wool snow, and add a paper sign naming the family for a display children love showing guests. Display the finished craft proudly where family and holiday guests can admire it.

Cotton Ball Christmas Trees
Glue rows of cotton balls onto cardboard in a triangle shape, then let children paint them with droppers, brushes, or spray bottles in rainbow colors. The cotton soaks up color in surprising ways, creating soft, tie-dye effects that make every tree unique. Add a yellow cotton ball star at the top, and sprinkle glitter while the paint is still damp for sparkle. This sensory project is perfect for toddlers and preschoolers, because squeezing droppers builds fine motor strength and mixing colors teaches early science. Display the finished trees on the wall, or cut them out and hang them as a bright, fluffy garland across a classroom or playroom. Let children name their tree and choose its color pattern, because ownership turns a simple painting activity into a proud piece of seasonal artwork. Let children choose their favorite colors and details to make each creation truly their own.

Cardboard Gingerbread Houses
Cut house shapes from brown cardboard, then decorate them with white paint icing lines, colorful paper candies, and tiny drawn windows. Children can add a snowman, a gingerbread person, and small paper trees beside the house to complete the scene. Unlike real gingerbread, these houses never crumble, need no baking, and can be displayed all season without going stale. Older kids can design elaborate houses with doors, chimneys, and wreaths, while younger children enjoy sticking on dots and squiggles freely. Make one large house together as a family project, or let each child create a small house for a delightful cardboard village on the mantelpiece. Photograph each finished house before display, so children can remember their designs and try even grander cardboard villages next Christmas. This simple project works beautifully for classrooms, playdates, and cozy family afternoons.

Cotton Ball Santa Beards
Cut a beard shape from white card, cover it with fluffy cotton balls, and attach elastic or ribbon so children can wear it like Santa. Add a red hat from paper or felt, and suddenly an ordinary afternoon becomes a North Pole dress-up game. Kids can practice gluing carefully, counting cotton balls, and trimming edges for a neat shape. The beard is light, comfortable, and reusable, so it works for school plays, family photos, and Christmas morning surprises. Pair it with a paper plate Santa face, or wear it while delivering handmade cards around the neighborhood for extra festive cheer and giggles. Take a photo of your child wearing the beard beside the tree, and keep it with other Christmas pictures for a funny, heartwarming family album. Keep spare paper, glue, and glitter nearby so children can happily make another one.

Paper Plate Christmas Wreaths
Cut the center out of a paper plate to leave a ring, then cover it with green tissue paper, painted handprints, or curled paper strips. Add red pom-pom berries, a big paper bow, and a loop of ribbon for hanging on a door or wall. This classic craft suits every age, because little children can scrunch and stick freely while older kids arrange patterns and balance colors. Making wreaths together is a lovely group activity for classrooms and family afternoons, and a row of different wreaths looks wonderful down a hallway. Encourage children to personalize their wreath with their name, the year, or a small photo in the center. Hang the wreath where children can see it daily, and replace the bow each year to refresh the decoration without starting the whole project again. Display the finished craft proudly where family and holiday guests can admire it.

Paper Plate Elf Faces
Paint a paper plate peach, add pointy paper ears, a green elf hat with a red zigzag collar, and big googly eyes for a cheerful workshop helper. Children can choose hair colors, cheek colors, and hat styles, so no two elves look alike. Add a cotton ball on the hat tip, draw a wide smile, and write the elf’s name underneath for storytelling fun. This craft pairs perfectly with reading Christmas stories, because children can hold up their elf while acting out scenes. Display the elves beside Santa crafts, hang them from a string, or use them as place cards at a festive family dinner table. Write a short story together about the elf’s adventures, and read it aloud at bedtime to extend the craft into imaginative Christmas play. Let children choose their favorite colors and details to make each creation truly their own.

Folded Paper Snowflakes
Fold a square of white or colored paper into a triangle, cut small shapes along the edges, and unfold it to reveal a unique snowflake. No two snowflakes turn out the same, which makes this craft a wonderful lesson about symmetry and creativity. Younger children can use safety scissors and simple snips, while older kids try detailed patterns, layered colors, and larger display snowflakes. Tape the finished snowflakes to windows, string them into a garland, or glue them onto cards and gift wrap. It is inexpensive, quiet, and satisfying, and a whole room can be transformed into a winter wonderland in a single afternoon. Save the best snowflakes in a folder between sheets of paper, so they can be reused next year or copied for new patterns and color combinations. This simple project works beautifully for classrooms, playdates, and cozy family afternoons.

Paper Plate Snowmen
Glue two white paper plates together, one for the head and one for the body, then add an orange paper carrot nose, black button eyes, and a colorful paper scarf. Cut mittens and boots from construction paper, and let children decide whether their snowman smiles, winks, or wears a silly expression. This project is perfect for winter displays, classroom bulletin boards, and fridge art, because the large plates give plenty of room for decorating. Children practice cutting, gluing, and arranging shapes while building a character they can name and describe. Make snowmen in different sizes, and line them up like a friendly snow family. Give each snowman a different scarf color and personality, and ask children to invent names and stories for the whole cheerful snow family. Keep spare paper, glue, and glitter nearby so children can happily make another one.

Pasta Christmas Tree Ornaments
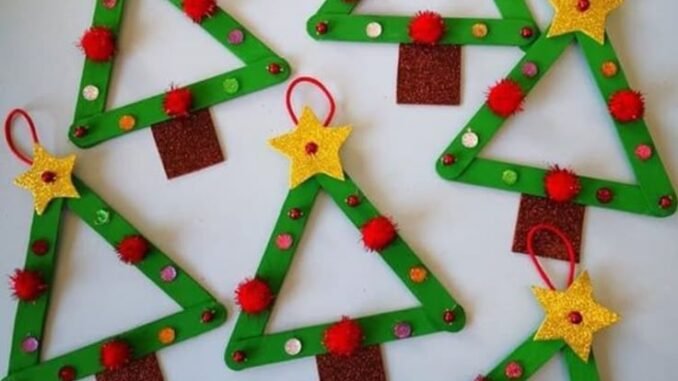
Paint bow-tie pasta green, glue the pieces in rows onto a cardboard triangle, and decorate with tiny pom-poms and a glittery gold star. Add a brown pasta trunk and a twine loop, and the ornament is ready to hang on the tree. Children love handling pasta shapes, sorting colors, and pressing pieces into place, which builds patience and fine motor control. This craft looks surprisingly elegant once finished, and it uses pantry supplies that cost very little. Make several trees in different sizes, give them as gifts, or hang a whole set together for a homemade tree theme that guests will admire. Varnish the finished ornaments lightly once dry, and pack them carefully in a labeled box so they survive storage until next December. Display the finished craft proudly where family and holiday guests can admire it.

Fingerprint Christmas Tree Cards
Draw a simple tree outline on dark card, then let children press green fingerprints inside the shape to form soft, leafy branches. Add red fingerprint baubles, a gold star sticker on top, and a handwritten message inside for a card that feels truly handmade. Fingerprint art is wonderfully forgiving, because uneven prints still look like foliage, and every card becomes one of a kind. This project works well for toddlers, who enjoy the sensory feel of paint, and for older children, who can plan patterns and color combinations. Send the cards to family far away, and they will treasure the tiny fingerprints for years. Press fingerprints gently and evenly for the clearest prints, and let younger children use one finger at a time to avoid smudging the tree outline. Let children choose their favorite colors and details to make each creation truly their own.

Handprint Antler Reindeer
Trace both of your child’s hands onto brown paper, cut them out, and glue them behind a paper reindeer face as tall, branching antlers. Add large googly eyes, pink paper cheeks, and a shiny red nose to complete Rudolph or one of his friends. This version is cleaner than paint handprints, so it works well in classrooms where mess must stay minimal. Children can also write a reindeer name, draw a snowy background, or add a scarf for extra character. Hang the finished reindeer on the wall, use it as a Christmas card front, or turn a set of them into a festive classroom display. Display the reindeer beside a paper Santa sleigh, and add cotton wool snow at the base to create a complete North Pole scene on the wall. This simple project works beautifully for classrooms, playdates, and cozy family afternoons.

Handprint Reindeer Paintings
Paint one whole hand brown, press it sideways onto paper, and add antlers, an eye, and a red nose to turn the print into a galloping reindeer. The thumb becomes the head, the fingers become legs, and the result looks delightfully playful and slightly wobbly, just like real children’s art should. Add a snowy ground line, falling paper snowflakes, and a simple sky for a complete winter picture. Frame the painting, or photograph it for Christmas cards and gift wrap. Parents love this craft because it preserves the exact size and shape of a little hand at Christmas, creating a keepsake to revisit every December. Write the child’s age and the year in a corner, then frame the painting where visitors can admire it throughout the festive season and beyond. Keep spare paper, glue, and glitter nearby so children can happily make another one.

Popsicle Stick Candy Canes
Draw a large candy cane outline on white card, then glue red and green popsicle sticks across it in stripes until the shape is filled. Children can count sticks, alternate colors, and practice careful gluing while building a bold, graphic decoration. Trim any sticks that poke past the outline with adult help, add a ribbon loop, and hang the cane on the tree or a door. This craft is ideal for younger children because the sticks are easy to grip and the pattern is simple to follow. It also makes a cheerful classroom display when many canes are hung together in a row. Hang several candy canes at different heights on a door or tree, and let children gift one to a friend wrapped in clear cellophane and ribbon. Display the finished craft proudly where family and holiday guests can admire it.

Paper Chain Christmas Garlands
Cut strips of red, green, gold, and white paper, loop them into linked rings, and staple or glue each ring to build a long, colorful chain. Children can follow a repeating pattern, count links, or make a countdown chain and remove one ring each day until Christmas. Paper chains are wonderfully simple, yet they transform a room instantly when draped across windows, doorways, and mantels. Add paper triangle bunting between chains, or mix in snowflakes and stars for extra variety. This is a perfect whole-family project on a rainy afternoon, because everyone can cut, loop, and link at their own pace. Count down by removing one link each evening, and let children write a small wish or kind deed on the back of each ring before linking it. Let children choose their favorite colors and details to make each creation truly their own.

Leave a Reply