
DIY Christmas Ornaments
There is something special about a Christmas tree dressed with ornaments you made yourself. Store-bought baubles can be beautiful, but handmade ornaments carry memories: the afternoon spent at the kitchen table, the smell of cinnamon and pine, and the small imperfections that make each piece one of a kind. Making your own ornaments is also kinder to your budget, and it lets you match your tree to your home exactly, from rustic farmhouse to bright and playful. You do not need fancy tools or years of crafting experience either. Most of the projects in this guide use supplies you already have at home, like flour, paper, ribbon, and pinecones from the yard. Work through one idea a weekend in the run-up to Christmas, or gather friends and family for a full ornament-making day. By the time you hang the last piece, your tree will tell a story no shop could ever sell.
Classic Salt Dough Ornaments
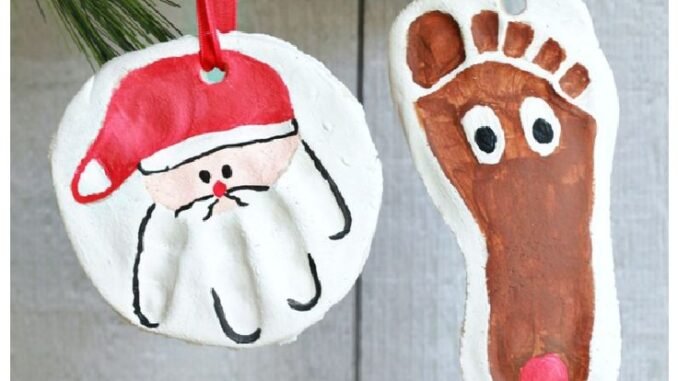
Salt dough is the classic starting point for handmade ornaments, and for good reason. You only need flour, salt, and water to make a smooth dough that rolls out like cookie dough and bakes hard in a low oven. Cut it with cookie cutters into stars, trees, gingerbread people, and candy canes, then poke a small hole at the top with a straw before baking so you can thread ribbon through later. Once the shapes are cool, paint them with acrylic paint and seal them with a coat of clear varnish so they last for years. Kids love pressing handprints and footprints into the dough to make Santa and reindeer keepsakes. Add a dusting of cinnamon to the dough for a warm scent, and keep the finished ornaments in tissue paper between holidays. For a professional finish, sand any rough edges lightly once the ornaments are fully cool, and date the back with a permanent marker so you can remember the year each one was made.

Clear Fillable Baubles You Can Personalize
Clear plastic baubles are a blank canvas, and they are one of the easiest ways to make ornaments that look far more expensive than they are. Twist off the cap and fill them with whatever suits your theme: tiny pinecones, faux snow, dried flowers, glitter, or small pom-poms. For a winter-scene bauble, layer fake snow at the bottom, add a miniature tree or house, and finish with a ribbon bow at the top. You can also slip a small handwritten note or a photo inside for a keepsake version. Because the baubles open and close, you can change the filling each year if your color scheme changes. Buy them in bulk, set up a filling station on the table, and let everyone make their own. A tiny funnel or a rolled piece of paper makes filling much easier, and a drop of hot glue around the cap keeps curious little hands from opening them.

Dried Orange Slice Ornaments
Dried orange slices bring a warm, old-fashioned glow to the tree, and they smell wonderful too. Slice oranges about a quarter inch thick, pat them dry, and bake them slowly in a low oven until they are crisp and translucent, turning them halfway through. This usually takes two to three hours, so it is a perfect lazy weekend project. Once cool, thread twine through a small hole, or tie the slice to a cinnamon stick with gingham ribbon and a sprig of greenery. The slices look beautiful against twinkling lights because the light shines through them like stained glass. They also make lovely garlands and gift toppers, and they keep well if stored dry. If you prefer not to use the oven, a food dehydrator works just as well, and the slices will keep their bright color for even longer.

Cozy Felt Ornaments
Felt is a forgiving craft material that does not fray, so it is ideal for ornaments you want to look neat without sewing skills. Cut two matching shapes from felt, stitch or glue them together around the edges, and stuff them lightly with cotton or felt scraps before closing. Simple shapes like stars, hearts, stockings, and Santas work beautifully, and you can add buttons, sequins, or embroidery for detail. A blanket stitch around the edge gives a charming handmade finish, but fabric glue works just as well if you prefer not to sew. Felt ornaments are soft and light, so they are safe for trees in homes with small children or pets, and they pack flat for storage. Choose wool-blend felt if you can, because it holds its shape better than craft felt and gives a slightly richer, more polished finish.

Rustic Pinecone Ornaments
Pinecones are free, plentiful, and instantly festive, which makes them a favorite for rustic trees. Gather cones from the yard or park, brush off dirt, and bake them briefly in a low oven to open the scales and remove any moisture. Then tie a loop of twine or ribbon around the top, add a bow, and hang them as they are for a natural look. For extra sparkle, dab the tips of the scales with white paint to mimic snow, or brush on glue and sprinkle glitter. A large pinecone with a wide ribbon bow makes a bold statement ornament, while small cones clustered together look lovely tucked among the branches. Finish with a light spray of sealant to keep glitter in place. You can also wire several small cones together into a cluster, which looks lovely hanging from a mantel or a door handle.

Folded Paper Star Ornaments
Paper stars are proof that the simplest materials can make the most striking ornaments. With just paper, scissors, and glue, you can fold three-dimensional stars that catch the light and add a crisp, Scandinavian feel to your tree. Start with a basic folded star in red and white, then try gold, kraft paper, or old sheet music for different moods. A touch of glitter along the edges or a small bead at the center adds polish. These stars are wonderfully light, so they hang happily even on the thinnest branches, and you can make a whole set in an evening. String several together on twine for a garland, or hang one large star as a tree topper. If you are new to paper folding, practice with scrap paper first, since the folds become much easier and neater after the first star.

Cinnamon Stick Ornaments
Cinnamon sticks do double duty as ornaments: they look charming and they fill the room with a spicy holiday scent. Bundle a few sticks together with twine and a small bow for a simple rustic ornament, or paint the top of a single stick to turn it into a tiny Santa, complete with a cotton beard. Cinnamon sticks also pair beautifully with dried orange slices and sprigs of fir, tied together into a fragrant bundle. Because they are sturdy, they are easy for children to decorate with paint and ribbon. Hang them near the bottom of the tree where their scent can drift, or tuck them into wreaths and garlands for a scented touch throughout the house. A bundle of cinnamon sticks tied with ribbon also makes a charming gift topper, especially when paired with a handwritten tag.

Sparkling Beaded Icicle Ornaments
Beaded icicles add a touch of glamour to the tree and catch the light beautifully. Thread beads onto wire or strong fishing line in a pattern of pearls, crystals, and seed beads, then bend the wire into a gentle curl at the top for hanging. You can follow a simple repeating pattern or mix beads freely for a more organic icicle shape. Silver, gold, and icy blue beads suit a frosty theme, while red and green beads feel more traditional. These ornaments are surprisingly quick once you get into a rhythm, and they make lovely gifts because they look so delicate. Make a set in one color family for a coordinated, elegant tree. Keep a small dish nearby for beads that roll away, and work on a felt mat so the beads stay put while you thread them.

Painted Wood Slice Ornaments
Wood slices bring a warm, woodland feel to the tree, and their flat surface is perfect for painting. Buy pre-cut slices with a hole already drilled, or cut and sand your own from a fallen branch. Paint them with chalk paint for a matte farmhouse look, then add simple designs: a wreath, a pine sprig, a word like joy, or a tiny winter scene. A fine paintbrush or a paint pen gives you control for lettering, and a coat of clear sealant protects the design. Wood slices are sturdy enough to be personalized with names and dates, which makes them wonderful year markers for a family tree. They also stack neatly for storage. Sand the edges lightly before painting, and wipe away dust with a dry cloth so the paint goes on smoothly and evenly.

Glitter Ornaments Without the Mess
Glitter ornaments are a holiday classic, but loose glitter can end up everywhere. The trick is to work inside a clear bauble or to seal glitter under a topcoat. Pour a little floor polish or clear glue inside a clear ornament, swirl it around, drain the excess, then add fine glitter and shake until the inside is evenly coated. Let it dry overnight before replacing the cap, and the sparkle stays trapped inside where it belongs. For foam or paper ornaments, brush on glue in a thin layer, sprinkle glitter over a tray to catch the excess, and finish with a clear sealant spray. The result is all sparkle with almost no cleanup. Work over an old baking tray when you shake on glitter, so you can tip the excess back into the jar and reuse it.

Photo Keepsake Ornaments
Photo ornaments turn your tree into a family album, and they quickly become the most treasured pieces in the box. Print favorite photos in black and white or color, trim them to fit inside a clear bauble, or mount them on a wooden disc with decoupage glue. A photo from each year makes a lovely tradition: choose one picture that sums up the year and add the date on the back. These ornaments are also thoughtful gifts for grandparents, who love seeing grandchildren on the tree. Use copies rather than original prints, and seal the photo under a layer of clear glue or varnish to protect it from humidity. Years later, these will be the ornaments everyone reaches for first. If you print photos at home, use matte paper rather than glossy, because it glues down more smoothly and shows fewer fingerprints.

Hand-Painted Glass Baubles
Hand-painted baubles look like heirlooms, but you can make them with plain glass ornaments and a little patience. Frosted baubles are forgiving because the matte surface hides small mistakes, and simple designs like bare winter trees, snowflakes, and dots of snow read beautifully. Use acrylic paint made for glass, work in thin layers, and let each layer dry before adding detail. A fine brush is best for branches and lettering, while the end of a paintbrush makes perfect snow dots. If you make a mistake, wipe it off with a damp cloth before it dries and start again. Finish with a clear sealant and handle the baubles gently when hanging. A lazy Susan or a small cup holding the bauble steady makes painting much easier, especially when you work on the curved surface.

Rustic Twig Star Ornaments
Twig stars are wonderfully simple and suit a natural, rustic tree perfectly. Collect straight twigs from the yard, trim them to equal lengths, and arrange five of them into a star shape, securing each joint with twine, hot glue, or thin wire. Leave the bark on for texture, or paint the finished star white or gold for a cleaner look. Twig stars look lovely on the tree, but they also work as window decorations, wreath accents, and gift toppers. Make them in different sizes for a layered effect, and add a small sprig of greenery or a cinnamon stick at the center for extra charm. They are sturdy, light, and cost almost nothing. Soak very dry twigs briefly in water before bending them, since slightly damp twigs are less likely to snap at the joints.

Fabric Scrap Ornaments
If you have a scrap bin, you already have the makings of beautiful fabric ornaments. Plaid, gingham, and festive prints make charming stuffed trees, stars, and stockings, and mixing patterns in one color family keeps the tree looking coordinated. Cut two shapes, sew or glue them together, stuff lightly, and add a ribbon loop. Layered fabric trees, made by stacking folded triangles of fabric, are especially pretty and use up even tiny scraps. Fabric ornaments are soft, washable, and safe around children and pets, and they bring a cozy, quilted warmth to the tree. They also make sweet gifts, especially when made from fabric with personal meaning. Iron your fabric scraps before cutting, because crisp fabric is far easier to sew neatly and gives a tidier finished shape.

Air-Dry Clay Ornaments
Air-dry clay is a wonderful alternative to salt dough because it needs no baking and dries to a smooth, sturdy finish. Roll it out, cut shapes with cookie cutters, and press in textures with lace, leaves, or stamps before it dries. A small hole at the top, made with a skewer, lets you add a ribbon hanger later. Drying takes a day or two depending on thickness, so turn the pieces over halfway through to keep them flat. Once dry, paint with acrylics in muted tones for a pottery look, or bright colors for a playful tree. Clay ornaments feel more refined than salt dough, which makes them lovely for gifts and for a grown-up tree. Roll the clay between two sheets of baking paper to keep your work surface clean and to get an even thickness every time.

Pom-Pom Ornaments
Pom-poms are pure fun, and they add softness and color to any tree. You can make them with yarn and a simple cardboard template, or buy ready-made pom-poms in every size and color. Glue pom-poms onto a foam ball to make a fluffy bauble, or stack them into little gnomes, snowmen, and animals with felt details. A white pom-pom ball with a red ribbon and a few pearl pins looks surprisingly elegant, while bright multicolor pom-poms suit a playful family tree. Pom-pom ornaments are light, unbreakable, and quick to make, so they are a great project for a craft night with friends. Keep extras for garlands and wreaths. Trim your pom-poms carefully with sharp scissors at the end, because a neat, round trim makes them look store-bought.

Fresh Evergreen Sprig Ornaments
Fresh evergreen sprigs bring the scent of the forest indoors, and small bundles tied with twine make beautiful natural ornaments. Gather sprigs of fir, cedar, pine, and juniper, trimming them to a few inches long, and tie two or three different types together with a ribbon or a small bell. These mini bundles look lovely tucked into the branches, hung from a garland, or tied to gifts. Because they are fresh, they will dry out over the season, but that is part of their charm, and they can be replaced easily with fresh clippings. Keep them away from open flames and hot lights, and mist them lightly to keep them fresh for longer. Choose sprigs with flexible stems rather than woody ones, since they tie more easily and sit more naturally against the branches.

Personalized Name Ornaments
Personalized ornaments make everyone feel like the tree belongs to them. Wooden reindeer shapes, baubles, and discs can be painted with each family member’s name, and children love finding their own ornament each year. Use a paint pen for neat lettering, or vinyl letters if your handwriting is shaky, and add the year on the back to track how the family grows. A set of matching name ornaments in one style looks intentional and polished, even if each one is slightly different. These ornaments also make wonderful stocking stuffers and place settings for the holiday table. Guests can take theirs home as a keepsake from your celebration. Test your lettering on paper first, and keep a damp cloth nearby so you can wipe away a wobbly letter before the paint dries.

Button Ornaments from the Jar
Almost everyone has a jar of spare buttons, and the holidays are the perfect excuse to use them. Thread buttons onto wire in a triangle shape to make a tiny button tree, topping it with a star bead, or glue buttons onto a foam ball for a colorful bauble. Red, green, and white buttons feel classic, while vintage mother-of-pearl buttons give a softer, heirloom look. Button ornaments are quick, inexpensive, and satisfying to make, because the supplies are already in your home. They are also a lovely way to use buttons from old clothes that carry memories. Sort buttons by color first, and keep a tray underneath to catch runaways. Mix button sizes within one ornament for visual interest, but stick to two or three colors so the finished piece still looks intentional.

Displaying Your Handmade Ornaments
Once your ornaments are made, give them the display they deserve. Hang larger, heavier pieces lower on the tree where branches are stronger, and save delicate pieces for eye level where they can be admired. Step back often as you decorate to check the balance of colors and textures, and tuck small handmade pieces deep among the branches so the tree looks full rather than decorated only on the outside. If you have more ornaments than tree, hang extras from a garland along the mantel, in a window, or from a branch in a vase. At the end of the season, wrap each ornament in tissue and label the box, so next year’s decorating starts with happy memories. Take a photo of your finished tree each year, because it is a lovely way to remember how your collection grows over time.

Leave a Reply