
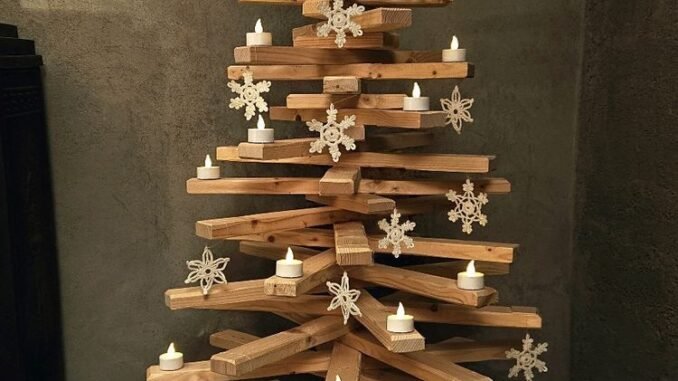
Wooden Christmas Trees DIY
Wooden Christmas trees are a beautiful, reusable alternative to a traditional evergreen, and making your own is easier than you might think. Whether you love rustic pallet wood, elegant driftwood, or a sleek modern design, there is a wooden tree project for every home, skill level, and budget. This guide walks you through twenty ideas, techniques, and tips, so you can build a tree that becomes a treasured part of your holidays for years to come.
Why Wooden Christmas Trees Are So Popular
Wooden Christmas trees have become a favorite alternative to traditional evergreens, and it is easy to see why. They bring warmth, texture, and a handcrafted feeling into a home, and they can be reused year after year without shedding a single needle. A wooden tree also suits almost any decorating style, from rustic farmhouse to clean modern minimalism, because wood itself is so versatile.

Another reason for their popularity is that they are kind to small spaces and busy households. A flat wooden tree can lean against a wall, hang on a door, or sit neatly on a tabletop, which makes it ideal for apartments, offices, and homes with pets or small children. When the season ends, most designs fold flat or come apart for easy storage until next December.
If you are new to wooden trees, start with a simple design and build your confidence before trying anything complex. A basic pallet tree needs only a few boards and an afternoon of work, yet it looks wonderful once decorated. As you gain experience, you can experiment with different woods, finishes, and shapes, and each tree you make will teach you something useful for the next one.
Choosing the Right Wood for Your Tree
The wood you choose sets the tone for the whole project, so it is worth thinking about before you cut anything. Pine and spruce are affordable, light, and easy to work with, which makes them perfect for beginners. Reclaimed pallet wood brings character and a weathered look, while hardwoods like oak and walnut give a more polished, heirloom feel.

Whatever you pick, check each board for cracks, warping, and stray nails before you start. Dry wood is essential, because damp boards can twist as they dry indoors and ruin a carefully built shape. If you are using pallets, choose heat-treated ones marked with HT, and avoid boards that look stained or smell strongly of chemicals.
The Classic Pallet Wood Christmas Tree
The pallet wood tree is the project that started the trend, and it remains the most popular design for good reason. It uses horizontal planks of decreasing length, fixed to a central spine, to form a simple triangle silhouette. The gaps between the planks let light through, which gives the tree a light, airy feel even when it is decorated.

To build one, cut your planks in graduated lengths, sand the edges smooth, and screw them to a sturdy vertical board from the back. A small wooden star or a simple finial finishes the top. You can leave the wood natural for a rustic look, or whitewash it for a softer, coastal feel that works beautifully in bright rooms.
Pallet trees also make wonderful gifts, because they are personal, practical, and easy to customize. Paint one in the recipient’s favorite color, add their initial in wooden letters, or choose ornaments that reflect their hobbies. A handmade tree shows far more thought than a shop-bought decoration, and it is something they can bring out and enjoy every single Christmas.
A Rustic Driftwood Christmas Tree
Driftwood trees have a sculptural, seaside charm that no other style can match. Each piece of wood is naturally weathered into a unique shape, so no two trees ever look alike. The pale, silvery tones of driftwood pair beautifully with white lights, shells, and simple linen ornaments for a calm, coastal Christmas.

Start by collecting straight-ish pieces in a range of lengths, or buy a bundle from a craft supplier if you cannot gather your own. Drill a hole through the center of each piece and thread them onto a dowel or metal rod, largest at the bottom and smallest at the top. A heavy base, such as a slice of log or a stone, keeps the finished tree stable.
Tabletop Wooden Trees for Small Spaces
Not every home has room for a full-size tree, and tabletop wooden trees solve that problem in style. These compact designs sit on a mantel, a side table, or a windowsill, and they still give you all the joy of decorating a tree. They are also wonderful for bedrooms, dorm rooms, and offices where a large tree would be impractical.

Tabletop trees come in many forms, from tiny stacked blocks to elegant spiral designs made from a single piece of bent wood. Because they are small, you can afford to use nicer wood and finer finishes, and you can make several in different styles to scatter around the house. A string of battery fairy lights makes even the smallest tree glow.
Small trees are also perfect for trying out new techniques without committing to a large project. Test a new stain, practice a tricky joint, or try a painted finish on a tabletop tree first. If something goes wrong, you have lost little time and material, and if it goes well, you can use the same approach with confidence on a full-size tree.
Wood Slice Christmas Trees
Wood slices, cut from branches and logs, make charming trees with a wonderfully natural look. The round faces show off the grain and growth rings of the wood, and the mix of sizes creates a mosaic effect that draws the eye. This style works especially well as wall art or as a centerpiece for a rustic holiday table.

To make one, glue wood slices of graduated sizes onto a triangular backing board, starting with the largest at the bottom. Fill any gaps with smaller slices or moss for a full, finished look. A slice tree needs no heavy frame, so it is light enough to hang with a single sturdy hook, and it stores flat against a wall.
The Ladder-Style Wooden Tree
Ladder trees are made from two angled side rails joined by horizontal rungs, forming an open triangle that leans against a wall. Their open design is part of their appeal, because ornaments can hang from the rungs at different depths, creating a lovely layered effect. They are also one of the easiest wooden trees to build.

Choose straight boards for the sides and cut the rungs to fit between them, spacing them evenly from bottom to top. Sand everything well, since hands will touch the rungs when hanging ornaments. A ladder tree can be decorated heavily or left almost bare, and it folds flat for storage if you join it with hinges instead of fixed screws.
One advantage of a ladder tree is how easy it is to change its look from year to year. Swap the ornaments, change the ribbon color, or add a new garland, and the whole tree feels fresh without any rebuilding. You can even move it between rooms, since it leans neatly against any wall and needs no assembly once it is built.
Wall-Mounted Wooden Christmas Trees
A wall-mounted tree is the perfect answer for very small homes, because it takes up no floor space at all. These designs range from simple plank triangles screwed to a backing board to elegant branch arrangements fixed directly to the wall with hooks. They are also a great choice for renters, since many versions hang from a single nail.

When you plan a wall tree, measure your wall carefully and mark the center before you start. Keep the design fairly flat so ornaments hang neatly without swinging into the wall. Battery lights work better than plug-in strings here, because you will not need to run a cord across the room to reach an outlet.
Modern Minimalist Wooden Trees
If your home leans modern, a minimalist wooden tree may suit you better than a rustic one. These designs use clean lines, pale woods, and simple geometric shapes, often with no ornaments at all. A single zigzag board, a slim triangle frame, or a set of nested wooden triangles can look striking against a plain white wall.

The secret to a good minimalist tree is restraint. Choose one type of wood, one finish, and at most one accent, such as a single strand of warm white lights or a small brass star. Because the design is so simple, your craftsmanship shows, so take extra care with measuring, sanding, and joining for crisp, clean results.
Minimalist trees also photograph beautifully, which matters if you like sharing your home at Christmas. A simple wooden triangle against a plain wall, lit by a single warm strand of lights, looks calm and intentional in photos. Avoid clutter around the tree, and let negative space do some of the work, so the tree itself remains the star of the scene.
Tools You Will Need
Most wooden tree projects need only basic tools, which is part of their charm. A saw, a drill, sandpaper, a measuring tape, and wood glue will cover almost every design in this guide. A jigsaw is helpful for curved cuts, and a miter saw makes repeated angled cuts faster and more accurate if you plan to make several trees.

Safety matters just as much as the tools themselves. Always wear safety glasses when cutting or sanding, and clamp your work firmly before you drill or saw. Keep your workspace tidy and well lit, and keep children and pets away from sharp tools. A few minutes spent setting up safely saves a great deal of trouble later.
Measuring and Cutting Your Pieces
Good measuring is the difference between a tree that looks neat and one that looks lopsided. Start by deciding the finished height and width, then work out the length of each plank, shrinking each one by the same amount as you move up the tree. Writing the lengths on a simple sketch keeps the whole project organized.

Cut slowly and steadily, and measure twice before every cut. If a piece comes out slightly short, do not panic, since small differences can often be hidden by sanding or by adjusting the spacing. Keep your offcuts, because they are perfect for making matching ornaments, stars, or small tabletop trees.
Borrowing tools from a friend or a local tool library is a smart option if you only plan to make one tree. You may also find that a neighbor with a workshop is happy to help with a few cuts in exchange for a slice of cake. Making a tree can become a social project, and sharing tools and skills is part of the pleasure of handmade holidays.
Sanding and Finishing for a Smooth Look
Sanding turns rough lumber into a piece you will be happy to display and touch. Start with a medium grit paper to remove splinters and rough spots, then move to a fine grit for a silky finish. Always sand along the grain, never across it, to avoid scratches that show up once the finish is applied.

After sanding, wipe the wood with a slightly damp cloth to remove dust, and let it dry fully. A clear oil or wax finish deepens the natural color and protects the wood, while a matte varnish gives a tougher surface that resists sticky fingers and dust. Whichever finish you choose, apply thin coats and let each one dry before adding the next.
Painting and Staining Ideas
Paint and stain let you match your wooden tree to your existing holiday decor. A dark walnut stain gives a rich, traditional feel, while a whitewash keeps the grain visible and brightens a small room. Chalk paint in sage green, dusty blue, or soft black can turn a simple tree into a statement piece.

If you want a distressed farmhouse look, paint the wood, let it dry, and then sand the edges lightly to reveal the wood beneath. For a cleaner style, use two thin coats of paint and a clear topcoat for durability. Whatever you choose, test your color on a scrap piece first, because paint and stain often look different on raw wood than they do in the can.
Testing finishes on scrap wood is a habit worth building into every project. The same stain can look very different on pine, oak, and reclaimed pallet wood, because each species absorbs color differently. A quick test board saves disappointment and lets you compare two or three options side by side in daylight before you commit to the whole tree.
Adding Lights to a Wooden Tree
Lights transform a wooden tree from a daytime decoration into a glowing evening centerpiece. Warm white fairy lights are the classic choice, because they flatter the natural tones of wood. Battery-operated strings are especially handy for wooden trees, since they avoid trailing cords and let you place the tree anywhere.

Wrap lights loosely around the frame, or weave them through the gaps between planks for a softer glow. If your tree is wall-mounted, use small adhesive clips to hold the wire neatly in place. Always check that your lights are in good condition, and never leave them switched on when you leave the house or go to bed.
Decorating With Ornaments and Garlands
Decorating a wooden tree is different from decorating a real one, because the branches are flat and the surface is solid. Lightweight ornaments work best, since heavy pieces can pull the tree off balance or strain small screws. Felt ornaments, wooden shapes, dried orange slices, and cinnamon sticks all suit the natural look of wood.

Garlands need a little thought too. A simple string of wooden beads, a paper chain, or a length of twine with small pinecones draped across the planks looks intentional and neat. Hang heavier items low on the tree, keep the top light, and step back often to check the balance of color and shape.
If you use real candles near a wooden tree, keep them in sturdy holders and never leave them burning unattended. Battery candles have improved enormously and now flicker convincingly, making them a safer choice for most homes. Place candles away from garlands and paper ornaments, and always keep a clear space around any open flame.
Making Trees With Kids
Wooden trees are a wonderful family project, because children can help with safe, simple steps and still feel proud of the result. Let kids sand pieces with fine paper, paint finished trees, and choose where ornaments go. Older children can help measure and mark boards, while adults handle all the sawing and drilling.

Keep the project relaxed and fun rather than perfect. A slightly crooked tree made together will mean more than a flawless one bought in a shop, and it will become a keepsake the family reaches for every year. Let each child make a small tabletop tree of their own to keep in their room.
Wooden Trees for Outdoor Spaces
Wooden trees are tough enough for porches, patios, and gardens, where real trees can struggle in wind and frost. A large pallet tree by the front door makes a welcoming statement, and smaller trees can line a path or flank a porch bench. Outdoor trees look wonderful wrapped in weatherproof lights.

For outdoor use, choose a durable wood and seal it well with exterior varnish or outdoor oil. Raise the base slightly off the ground so rain does not pool around it, and bring the tree under cover during severe storms. With a little care, an outdoor wooden tree will last for many seasons.
Storing Your Wooden Tree After Christmas
One of the best things about a wooden tree is that it can be stored and reused, but good storage keeps it looking its best. Clean off dust and glitter, remove ornaments and lights, and check for any loose screws or joints that need tightening before you pack it away. A quick repair now is much easier than a rebuild next December.

Flat trees can be wrapped in an old sheet and leaned against a wall, while larger trees do well in a dry garage or loft. Avoid damp sheds, because moisture can warp wood and encourage mold. Label your storage wrap with the year, so you can spot the tree easily when the holidays come around again.
Fixing Common DIY Mistakes
Even experienced makers run into problems, and most are easy to fix. If your tree leans, check that the base is level and wide enough, and add a small support foot if needed. If planks look uneven, a light sanding and a slight adjustment to the spacing usually restores a neat, even silhouette.

Split wood is another common issue, usually caused by screwing too close to the end of a board. Drill pilot holes before driving screws, and keep fixings at least a couple of centimeters from the ends. If a split does happen, wood glue and a clamp will usually repair it invisibly once it is sanded and finished.
Gifting Handmade Wooden Trees
A handmade wooden tree makes a thoughtful gift, because it carries the time and care of the maker. Small tabletop trees are perfect for friends, teachers, and coworkers, and they can be personalized with a painted name, a special date, or a favorite color. Wrap the tree in tissue and a sturdy box so it arrives in perfect condition.

If you enjoy making them, consider producing a small batch before the holidays and giving one to each person on your list. Handmade gifts stand out in a season of shop-bought presents, and a wooden tree is something the recipient can display year after year. Include a short note explaining the wood you used and how to care for it.
Leave a Reply