
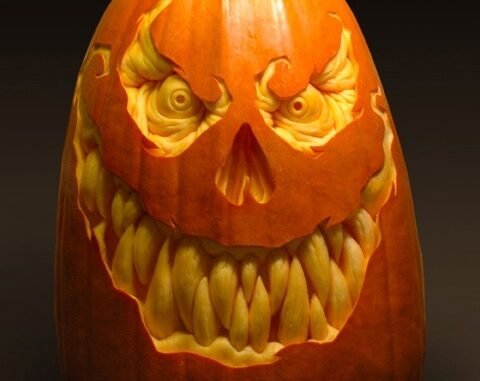
Halloween Pumpkin Carving Ideas: 20 Spooky Designs for 2026
Nothing says Halloween quite like a glowing jack-o’-lantern on the porch. Whether you are a first-time carver or a seasoned pumpkin artist, the right design can turn an ordinary pumpkin into the star of your street. This guide rounds up 20 Halloween pumpkin carving ideas for 2026, ranging from quick five-minute faces to show-stopping scenes that will have neighbors stopping for photos. Each idea includes a difficulty rating, the tools you will need, and practical tips to get clean cuts and a longer-lasting pumpkin. Grab your carving kit, pick a plump pumpkin with a sturdy stem, and let’s get carving.
1. The Classic Jack-o’-Lantern Grin

**Difficulty:** Easy | **Tools:** Basic carving kit, marker, spoon
The timeless triangle eyes and toothy grin never go out of style, and for good reason. Start by drawing your face on the pumpkin with a dry-erase marker so you can wipe away mistakes. Cut the lid at a slight angle so it does not fall inside, then scoop out every string and seed — a clean interior makes the light glow evenly. When cutting the features, use a gentle sawing motion rather than pushing the blade straight through, which gives you smoother edges. For extra character, make one tooth longer than the rest or add arched eyebrows. Rub a little petroleum jelly on the cut edges to slow down shriveling and keep your classic grin looking fresh for up to a week.
2. Haunted House Silhouette

**Difficulty:** Medium | **Tools:** Carving kit, craft knife, template or printed stencil
A haunted house silhouette turns your pumpkin into a miniature horror movie set. Print a haunted house template from the internet, tape it to the pumpkin, and poke the outline through with a pin or thumbtack. The trick here is contrast: carve away the house shape completely so it glows bright, but leave the windows as solid pumpkin with only thin cut lines around them so they shine like lit windows. Work from the center of the design outward to avoid cracking thin sections. A tall, oval pumpkin gives you more vertical room for the crooked chimneys and pointed rooflines. Place an LED candle inside rather than a real flame so the delicate cut edges do not scorch.
3. Black Cat on the Prowl

**Difficulty:** Easy | **Tools:** Basic carving kit, marker
Few symbols scream Halloween like a black cat with an arched back. This design is perfect for beginners because the silhouette is bold and forgiving — wobbly lines just make the cat look spookier. Draw a simple cat shape with a curved tail and pointed ears, then cut out the entire silhouette so it glows against the night. For a striking effect, leave the eyes as uncut pumpkin and carve two small slits that will shine when lit from inside. Choose a medium round pumpkin so the cat fits comfortably without crowding the edges. If freehand drawing feels intimidating, trace a cat cookie cutter pressed lightly against the skin as your guide.
4. Witch Flying Across the Moon

**Difficulty:** Medium | **Tools:** Carving kit, pin tool, stencil
This dramatic scene features a witch silhouette soaring past a glowing full moon. Carve a large circle for the moon first, removing all the flesh so it blazes bright, then carve the witch as a dark uncut silhouette layered in front of it. The magic is in the negative space: the witch stays solid pumpkin while the moon glows around her. Use a pin tool to transfer the witch outline from a printed stencil, keeping the broomstick thin but connected to the body so nothing breaks off. A flameless tea light placed low in the pumpkin casts the most even glow across the moon. This one photographs beautifully, so set it where trick-or-treaters can see it.
5. Creepy Spider Web

**Difficulty:** Easy | **Tools:** Carving kit or linoleum cutter, marker
A spider web design looks impressively intricate but is surprisingly simple. Draw concentric circles connected by straight radial lines, like a bicycle wheel. Instead of cutting all the way through, try the etching technique: scrape away only the outer skin with a linoleum cutter or the edge of a spoon, leaving the flesh intact so the web glows softly when lit. Add a small spider by carving a round body and eight thin legs — keep the legs short so they do not snap. This design works wonderfully on white “ghost” pumpkins for an extra-eerie look. Because most of the pumpkin stays intact, etched webs last much longer than fully cut designs, often up to ten days.
6. Friendly Ghost Faces

**Difficulty:** Easy | **Tools:** Basic carving kit, marker
Not every Halloween pumpkin needs to be terrifying — a cluster of goofy ghost faces is perfect for families with young kids. Carve three or four simple ghosts of different sizes across the pumpkin: oval eyes and a wavy open mouth are all you need. Vary the expressions so one looks surprised, one looks happy, and one looks spooky. Because the shapes are simple and chunky, this is a great project to do with children (let adults handle the sharp tools while kids draw the faces and scoop the guts). A squat, wide pumpkin gives you the most surface area for your ghost family. Finish by placing the pumpkin near your walkway where its cheerful glow welcomes trick-or-treaters.
7. Vampire with Fangs

**Difficulty:** Medium | **Tools:** Carving kit, craft knife
Give your porch some bite with a vampire face complete with sharp fangs. The key features are narrowed, menacing eyes and a wide mouth with two pointed fangs hanging down. Draw the design first, paying special attention to the fang shapes — cut them as downward triangles and be careful not to make them too thin or they will break. For the eyes, carve angled slits that tilt down toward the nose for a sinister glare. A clever trick is to leave small pumpkin “drips” below the mouth uncut and paint them red to look like dripping blood. Use a deep orange pumpkin for the richest glow, and position a bright LED light close to the face so the fangs cast dramatic shadows.
8. Day of the Dead Sugar Skull

**Difficulty:** Hard | **Tools:** Detail carving kit, linoleum cutter, stencil
Inspired by Día de los Muertos, the sugar skull pumpkin is a stunning work of art. This design relies on etching rather than cutting through: scrape away the skin to create the skull shape, floral patterns around the eyes, and decorative dots, letting the light shine softly through the thinned flesh. Print a sugar skull stencil and transfer it with pinpricks, then take your time — this is a project for a quiet afternoon, not a rushed evening. Work in good lighting and keep your tools sharp for the fine detail. The result is breathtaking when lit: the etched areas glow in different intensities depending on how deeply you scraped. Seal the finished pumpkin with a light coat of clear acrylic spray to preserve the detail.
9. Frankenstein’s Monster

**Difficulty:** Medium | **Tools:** Carving kit, marker, gray/green paint (optional)
Dr. Frankenstein’s creation makes a fantastic pumpkin subject with his flat-topped head and neck bolts. The rectangular head shape means you can use a tall pumpkin to great effect. Carve heavy-lidded eyes, a stitched mouth using short perpendicular cuts, and a square jawline. The neck bolts are the signature detail — carve two small squares on the sides and push short wooden dowels or gray-painted corks through for a 3D effect. For extra fun, paint the pumpkin green before carving (use acrylic craft paint and let it dry fully). The stitches across the forehead can be etched lightly so they glow while the rest of the face is cut through. This monster is alive with personality.
10. Scary Clown Face

**Difficulty:** Medium | **Tools:** Carving kit, craft knife, red paint
Clowns are creepy enough without pumpkins, but a carved clown face takes Halloween fright to the next level. Draw an exaggerated grin stretching ear to ear, round clown nose (carve it as a circle that stays attached at the top so it juts out slightly), and arched painted eyebrows. The eyes should be large hollow circles for maximum spook factor when lit. Paint the carved mouth area red after cutting for a sinister smile that shows even in daylight. Warning: this design genuinely frightens small children, so place it thoughtfully — maybe off to the side rather than right by the candy bowl. Use a large round pumpkin to fit all the exaggerated features comfortably.
11. Wise Old Owl

**Difficulty:** Easy | **Tools:** Basic carving kit, marker
An owl perched in the night is a charming alternative to the usual scary faces. Carve two big round eyes, a small triangular beak, and layered feather scallops etched around the body. The etching technique shines here: scrape feather textures into the skin so they glow softly while the eyes are cut clean through for a piercing stare. A round pumpkin suits the owl’s plump body perfectly. Add two small ear tufts at the top by leaving pointed sections uncut. Kids love this one, and it fits beautifully into a fall harvest display alongside corn stalks and mums even after Halloween passes. Because the design uses mostly etching, your owl will stay handsome for over a week.
12. Bat Swarm at Dusk

**Difficulty:** Easy | **Tools:** Basic carving kit, marker
A swirling swarm of bats is one of the easiest dramatic designs you can carve. Draw five to seven simple bat shapes — each is just a scalloped “M” curve with a small body — in different sizes scattered across the pumpkin. Cut them all the way through so they glow bright against the dark night. Arrange the bats as if flying in a spiral toward the top of the pumpkin for a sense of movement. This design is very forgiving: uneven bats still look great, and you can add as many as you like. A tall pumpkin gives the swarm room to spread its wings. Pair it with a purple or orange spotlight behind the pumpkin to amplify the spooky night-sky effect.
13. Zombie Hands Rising

**Difficulty:** Medium | **Tools:** Carving kit, craft knife
Nothing says horror like zombie hands clawing their way out of the ground — and onto your pumpkin. Carve two or three bony hands reaching upward from the bottom of the pumpkin, with long fingers and ragged sleeves. The trick is keeping the fingers thick enough to survive; thin carved fingers snap easily, so make them chunky and gnarled. Etch cracked-earth lines around the hands for a graveyard feel. For a truly gruesome touch, bend a few fingers at odd angles by carving them in segments. Place this pumpkin low to the ground near your steps so the hands appear to rise from your actual yard. A green-tinted LED light inside gives the zombie flesh an appropriately sickly glow.
14. Grinning Skeleton

**Difficulty:** Medium | **Tools:** Carving kit, detail knife, stencil
A skull with a wide grin is Halloween royalty. Transfer a skull stencil with pinpricks, then carve the large eye sockets and nasal cavity clean through. The teeth are the make-or-break detail: carve a wide mouth, then cut thin vertical lines for individual teeth, keeping them evenly spaced and not too narrow. Etch cracks across the forehead and cheekbones for an ancient, unearthed look. A white or pale pumpkin makes the skeleton theme even more convincing. Take your time with the teeth — rushing causes slips that ruin the symmetry. When lit from within, the hollow eyes cast deep shadows that make this skull look like it is staring straight through your guests.
15. Candy Corn Stripes

**Difficulty:** Easy | **Tools:** Carving kit, yellow/orange/white paint, painter’s tape
Celebrate Halloween’s most iconic candy with a candy corn pumpkin. This is a no-carve (or minimal-carve) project: paint horizontal stripes in white, orange, and yellow around the pumpkin, using painter’s tape for crisp lines. If you want it to glow, carve a simple face first, then paint around it carefully. The classic candy corn order is white on top, orange in the middle, yellow at the bottom — just like the real treat. A tall, tapered pumpkin mimics the candy corn shape best. This design is perfect for households with toddlers since no sharp tools are required for the painted version. It also lasts for weeks, making it a great early-October decoration.
16. Drilled Polka-Dot Lantern

**Difficulty:** Easy | **Tools:** Power drill with various bit sizes, marker
Put down the knives and pick up a drill for this modern, gorgeous design. Mark a pattern of dots across the pumpkin — try graduated sizes, swirling spirals, or constellation patterns — then drill straight through with different-sized bits. The result is a stunning starry-night lantern effect when lit, with zero carving skill required. This is the safest pumpkin project for older kids to help with (with adult supervision on the drill). Vary the bit sizes for visual interest: tiny holes glow like distant stars while large ones blaze. Because you are removing so little material, drilled pumpkins last the longest of any design — often two full weeks. Try the Big Dipper or Orion for an astronomy-themed twist.
17. Falling Autumn Leaves

**Difficulty:** Easy | **Tools:** Carving kit, leaf stencil or real leaves, marker
Bridge the gap between Halloween and Thanksgiving with an elegant falling-leaves design. Trace real maple or oak leaves onto the pumpkin (or use a printed stencil), then etch them into the skin rather than cutting through so they glow softly like backlit foliage. Scatter five or six leaves of different sizes drifting diagonally across the pumpkin as if caught in a breeze. Add a few etched swirl lines to suggest wind. This sophisticated design appeals to adults who want festive decor without the gore, and it stays relevant straight through November. A deep orange pumpkin with rich color gives the most beautiful glow. Seal the etched areas with petroleum jelly to keep them vibrant.
18. Silly Emoji Faces

**Difficulty:** Easy | **Tools:** Basic carving kit, yellow paint, marker
Bring your text messages to life with emoji pumpkins. Paint the whole pumpkin bright yellow, then carve classic emoji faces: the laughing-crying face, the heart-eyes face, the winking face, or the poop emoji for maximum kid giggles. One pumpkin per emoji lets you line up a whole “keyboard” along your porch steps. The painting step is essential — without the yellow base, the joke does not land. Carve the features simply and boldly since fine detail gets lost on the painted surface. This is the ultimate kid-pleaser design and a huge hit for Halloween parties. Let children pick their favorite emoji and draw it on while an adult handles the cutting.
19. Haunted Castle Under a Full Moon

**Difficulty:** Hard | **Tools:** Detail carving kit, stencil, pin tool
The haunted castle is the crown jewel of pumpkin art — a full gothic scene with towers, arched windows, and a blazing moon. Transfer a detailed castle stencil with pinpricks, then carve the moon completely through while etching the castle walls so they glow more dimly, creating depth between foreground and background. Cut the arched windows as tiny glowing rectangles. The bats flying around the towers can be fully cut for contrast. This is an advanced project that rewards patience: budget a full evening and keep a reference photo handy. Choose the largest, smoothest pumpkin you can find — surface bumps distort the fine lines. When finished and lit, this masterpiece will be the most photographed pumpkin on the block.
20. Mini Pumpkin Diorama

**Difficulty:** Hard | **Tools:** Carving kit, craft knife, small figurines or cutouts
Instead of carving a face, turn your pumpkin into a tiny haunted world. Cut a large window in the front of the pumpkin, hollow it completely, and build a miniature scene inside: a tiny graveyard with craft-foam tombstones, a cotton-ball ghost, or a miniature haunted house. Paint the interior dark blue or black so the scene pops, and place a small LED light behind the figures to silhouette them through the window. This 3D approach is endlessly creative — no two dioramas look alike. It is more craft project than carving, making it ideal for artistic types who find traditional faces boring. Display it at eye level on a porch table where visitors can peer inside and discover the tiny spooky details.
**Conclusion**
From the five-minute classic grin to the show-stopping haunted castle diorama, these 20 Halloween pumpkin carving ideas prove there is a perfect design for every skill level and every style — spooky, silly, or sophisticated. Remember the golden rules: draw your design first, keep your tools sharp, scoop the pumpkin clean, and use LED lights instead of real candles for safety and longevity. Rub petroleum jelly on cut edges to keep your masterpiece fresh, and do not be afraid to mix techniques — etching, drilling, and painting all play well together. Now pick your favorite idea, grab the biggest pumpkin in the patch, and make this Halloween your most creative one yet. Happy carving!
Leave a Reply