
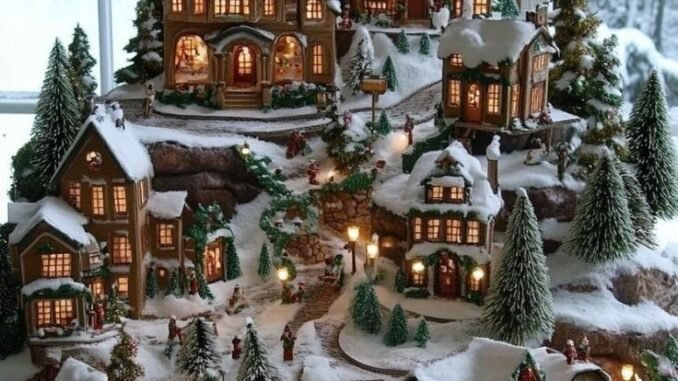
Christmas Village Displays
There is something magical about a Christmas village display. Tiny glowing houses, snow-dusted streets, miniature trees, and little figures going about their festive business can turn an ordinary mantel, table, or windowsill into a winter wonderland. Whether you collect ceramic villages, build a scene under the tree, or simply love the charm of a miniature town, a well-planned display brings warmth and nostalgia to your home. This guide covers twenty ideas for creating beautiful Christmas village displays, from choosing your pieces to lighting, layout, and finishing touches that make your village feel alive. Many collectors begin with a single house received as a gift and add a piece each year, so the village slowly becomes a record of family Christmases. Others plan a grand display from the start, with mountains, rivers, and a working train. Either approach works beautifully. What matters most is that the display reflects your taste and fits your home, whether that means a sprawling tabletop town or a single shelf of glowing cottages. The ideas below will help you plan, build, and enjoy a village display that delights everyone who sees it, year after year.
Starting Your First Village
Starting your first Christmas village is an exciting project, and it does not need to be expensive. Begin with a few key pieces: two or three houses, a church or shop, some trees, and a handful of figures. Many collectors start with a single set and add one or two pieces each year, which makes the village grow into a meaningful tradition. Choose a scale and stick to it so the pieces look right together, and pick a style you love, whether that is classic ceramic, rustic wooden, or brightly painted. Before you buy, decide where the village will live: a mantel, a sideboard, or a dedicated table. Measure the space so your village fits comfortably, and leave room for it to grow in future years.

Choosing a Display Surface
The surface you choose shapes your whole display. A mantel gives a classic, eye-level view, while a sideboard or console table offers more room for streets and scenery. A dedicated table lets you build a larger village with room for a train or skating rink. For small spaces, a windowsill, a shelf, or even a large tray can hold a charming mini village. Whatever surface you choose, make sure it is sturdy, near an outlet for lights, and safe from curious pets and small children. Cover the surface with a white cloth, batting, or a purpose-made snow blanket to protect it and to create an instant snowy base. A stable, well-chosen surface is the foundation of a display you will enjoy all season.

Creating a Snowy Base
A snowy base transforms a flat surface into a winter landscape. White cotton batting, snow blankets, and fake snow powder are all popular choices, and each gives a different effect. Batting is easy to drape over uneven surfaces and hides cords well, while loose snow looks natural scattered around buildings and trees. For a more permanent base, paint a board white and add texture with modeling paste or glitter for sparkle. Layer the snow unevenly, with gentle drifts against walls and deeper piles in corners, to make the scene feel natural. Avoid covering windows and doors completely, and leave pathways clear where figures and street lamps will stand. A good snowy base makes every building look as if it belongs in a real winter town.

Lighting Your Village
Lighting is what brings a Christmas village to life. Warm white lights glowing through tiny windows create a cozy, lived-in feeling that is the heart of the display. Most ceramic villages come with their own lights, but you can add string lights, battery tea lights, and small spotlights for extra glow. Hide cords under the snow base or behind buildings, and use a power strip with a timer so the village lights up automatically each evening. Avoid mixing very warm and very cool lights, as the clash can look unnatural. A few well-placed lights matter more than a flood of them: light the main street, the church, and one or two feature buildings, and let the rest glow softly. Dim the room lights and enjoy the magic.

Arranging Houses and Streets
Arranging your village is like planning a real town. Place taller buildings at the back and smaller ones at the front so every piece is visible. Leave space between houses for streets, paths, and small gardens, and angle some buildings slightly rather than lining them up rigidly, which looks more natural. Create a main street with shops and lamps, and cluster homes around a central square or church. Think about sightlines: the most detailed or favorite pieces deserve the most visible spots. Step back often as you arrange, and view the display from different angles, including the angle from which guests will see it. A thoughtful layout turns a collection of pieces into a believable little town.

Adding Trees and Greenery
Trees and greenery give your village depth and a natural, wooded feel. Use a mix of sizes: tall bottle-brush trees behind buildings, medium trees along streets, and tiny trees in gardens and window boxes. Vary the shades of green and add a few snow-frosted trees for winter realism. Small wreaths on doors, garlands along fences, and tiny potted evergreens add detail at eye level. Greenery also helps hide cords, bases, and the edges of risers. For a realistic look, cluster trees in small groups rather than spacing them evenly, as real trees grow in clusters. A few bare twig trees can add variety, suggesting the winter woods beyond the town. With thoughtful greenery, your village will feel like a place surrounded by forest.

Figures and Everyday Scenes
Figures are what make a village feel alive. Carol singers, skaters, shoppers, children building snowmen, and a Santa with his sleigh all tell tiny stories within the scene. Place figures in natural groups: carolers outside the church, shoppers near the stores, children around the skating pond. Avoid overcrowding, which can make the scene look cluttered; a few well-placed figures have more charm than dozens scattered everywhere. Match figure scale to your buildings, and check that figures do not block windows or doorways. Small accessories like benches, mailboxes, and market stalls add to the storytelling. When guests lean in close and discover these little scenes, that is when a village display truly delights.

Building Levels and Hills
Levels and hills add drama and visibility to a village display. Raising the back rows on sturdy boxes, books, or foam risers hidden under snow lets every building be seen, even in a deep display. Gentle slopes made from foam or stacked boards create a hillside town, with houses stepping down toward a central square. Make sure every level is stable before placing fragile pieces, and test the arrangement before adding lights. Levels also create natural places for waterfalls, bridges, and winding paths. Even a single raised platform at the back can transform a flat display, giving it depth and a sense of a town nestled in the hills. Just keep the tallest pieces away from edges where they could be knocked over.

A Village Under the Tree
A village under the Christmas tree is a beloved tradition. The tree’s lights glow above the tiny town, and the scene feels like a storybook coming to life. Use a sturdy tree skirt or a low platform as the base, and arrange the village around the trunk, leaving the front open for viewing. Keep the village clear of low-hanging branches and heavy ornaments, and make sure the tree stand is stable and watered without splashing the display. Battery lights work well here, avoiding extra cords near the tree. A train circling the village under the tree adds movement and joy, especially for children. This classic arrangement brings the whole room together around one magical centerpiece.

Mantel Village Displays
Mantel displays put your village at eye level, where its glowing windows can be admired from across the room. A mantel suits a smaller village: a row of houses, a church, trees, and a few figures, arranged along the shelf. Use a snow runner as the base, and place taller pieces toward the ends or center to frame the arrangement. Be careful with heat if you use the fireplace below: keep the village clear of real flames and excessive warmth, and use battery lights if needed. Garland and stockings can frame the village beautifully, but keep them from crowding the buildings. A mantel village is a perfect choice for smaller homes, and it makes the fireplace the warm heart of your holiday decorating.

Adding a Train and Movement
A moving train brings a village display to life like nothing else. A small loop of track circling the village, with a tiny engine and festive cars, draws the eye and delights children and adults alike. Choose a train scale that matches your village, and keep the track flat and clear of snow drifts that could derail it. Battery-operated trains are simplest for small displays, while electric sets suit larger permanent setups. Add a station, a crossing sign, and a few waiting figures to make the train part of the story. A skating rink with moving skaters, a rotating carousel, or a working mill can add further movement. Even one moving element transforms a still scene into a living miniature world.

Skating Ponds and Winter Activities
Skating ponds and winter activities give your village a playful heart. A small mirror or shiny blue board makes a convincing frozen pond, edged with snow and surrounded by tiny skaters, benches, and a warming hut. Add a sledding hill with children and sleds, a snowman-building family in a garden, or a Christmas tree lot with shoppers choosing trees. These activity scenes work best as focal points in open areas of the display, where they can be seen clearly. Keep the pond away from the main street so it feels like a park within the town. Activity scenes invite viewers to linger and discover details, and they capture the joyful, outdoors spirit of a winter holiday.

Themed Villages to Try
Themed villages let you create a display with a distinct personality. A Victorian village, with elegant shops and horse-drawn carriages, feels timeless and romantic. An alpine village, with chalets and snowy peaks, feels cozy and rustic. A seaside Christmas village, a storybook village, or a North Pole village with Santa’s workshop each tell a different story. Pick a theme and choose pieces that fit it, from building styles to figure costumes. A consistent theme makes shopping easier too, since you can pass over pieces that do not match. You can also mix themes gently: a mostly Victorian village can still welcome a single whimsical piece. Themed displays feel curated and intentional, and they make wonderful conversation pieces.

DIY Village Pieces
Making your own village pieces adds a personal touch and saves money. Simple cardboard or wooden houses, painted and glittered, can sit happily alongside store-bought pieces. Craft foam, clay, and papier-mâché can become hills, bridges, and market stalls. Small jars with battery tea lights make glowing street lamps, and twigs become bare winter trees. Children especially love helping to make village pieces, and handmade items often become treasured keepsakes. Start with one or two simple projects, such as a small cottage or a bridge, and build your skills over time. DIY pieces do not need to be perfect: their handmade charm is exactly what makes a village feel personal and loved.

Budget-Friendly Village Ideas
A beautiful village display does not require a big budget. Thrift stores, dollar stores, and post-Christmas sales are excellent sources for houses, trees, and figures. Start small and add pieces gradually, one or two each year, so the cost spreads out. Use household items creatively: white sheets or towels become snow, jars become lamps, and small boxes become risers. Focus your spending on a few feature pieces you love, and fill in around them with simple, inexpensive trees and figures. A small, well-arranged village looks far better than a large, cluttered one. With patience and creativity, you can build a display that looks rich and magical for very little money.

Storing and Protecting Pieces
Proper storage protects your village for years to come. Wrap each ceramic piece individually in tissue or bubble wrap, and store pieces upright in sturdy boxes with dividers. Label boxes clearly so you can find favorite pieces quickly next year. Keep village pieces in a cool, dry place away from attics that freeze or overheat, which can crack ceramics. Small figures and accessories belong in labeled bags or small boxes so nothing gets lost. Take a photo of your finished display before packing it away: the photo becomes your setup guide next Christmas. Good storage takes a little time in January, but it saves money and heartache, and it means your village comes out next year in perfect condition.

Village Displays for Small Spaces
Small spaces can still host a charming village. A single shelf, a windowsill, or a large tray can hold three or four houses, a few trees, and a couple of figures, creating a complete little scene. Choose smaller-scale pieces for tight spaces, and use vertical elements, like a tall church or a street lamp, to add interest without taking up room. A tiered stand or a cake stand creates levels in a tiny footprint. Battery lights avoid cord clutter in small displays. Even a single house with a tree and a figure on a side table can feel like a village in miniature. The secret is editing: a few well-chosen pieces in a small space look far more magical than a crowded shelf.

Involving Kids and Family
Building a village display is a wonderful family tradition. Children love placing figures, sprinkling snow, and deciding where each house should go. Give younger children sturdy, less fragile pieces to arrange, and let older children design whole sections, like the park or the market square. Make setup a yearly event, with hot cocoa and Christmas music, and let the village grow as the family does. Adding one new piece each year, chosen by a different family member, builds a collection full of memories. Over time, the village becomes more than decoration: it becomes a story of your family’s Christmases, with every piece holding a memory of the year it arrived.

Photographing Your Village
Photographing your village preserves the magic and helps you recreate it next year. Shoot in the evening with the room lights low so the village lights glow warmly. Get down to village level rather than shooting from above, which makes the scene feel life-sized and real. Use a tripod or a steady surface for sharp photos in low light, and try close-ups of favorite scenes alongside wide shots of the whole display. Avoid flash, which flattens the glow and creates harsh reflections on ceramic surfaces. Photograph the layout from several angles before packing away, so next year’s setup is easy. Beautiful village photos also make lovely holiday cards and social media posts to share with family.

Planning Next Year’s Village
Every village display is a work in progress, and planning next year’s additions is part of the fun. After Christmas, note what worked and what did not: which areas felt crowded, which pieces need replacing, and what new scene you would love to add. Watch for post-holiday sales on pieces that fit your theme, and keep a small wish list for birthdays and gifts. Consider a new focal point each year, such as a skating rink, a train station, or a market square, to keep the display fresh. A village that grows slowly, with thought and love, becomes a treasured tradition. Start planning now, and next Christmas your village will be more magical than ever.

Before you start building, a few practical tips will save time and frustration. First, test all lights before arranging anything, since replacing a dead bulb buried under snow is annoying. Second, keep a small box of spare trees, figures, and lamps handy for filling gaps you only notice once the display is nearly done. Third, photograph each stage of your setup so you can recreate or improve it next year. Fourth, use a timer for the lights so the village glows each evening without you remembering to switch it on. Finally, leave one small empty spot in the display on purpose: it gives you a natural home for the new piece you will inevitably fall in love with before next Christmas. A village is never truly finished, and that is exactly what makes collecting so enjoyable.
When the season ends, resist the urge to rush the pack-away. Take one last evening to enjoy the village with the room lights low, and let children pick their favorite scene to photograph. Clean each piece gently with a soft, dry cloth before wrapping, and check for loose parts or bulbs that need replacing before next year. A little care now means next December’s setup will be smoother, faster, and just as magical as the first time you built it.
A Christmas village display is one of the most charming ways to decorate for the holidays. With thoughtful arrangement, warm lighting, and little scenes full of life, even a small collection can become a magical miniature world. Start where you are, add pieces you love, and enjoy watching your village grow year after year.
Leave a Reply