
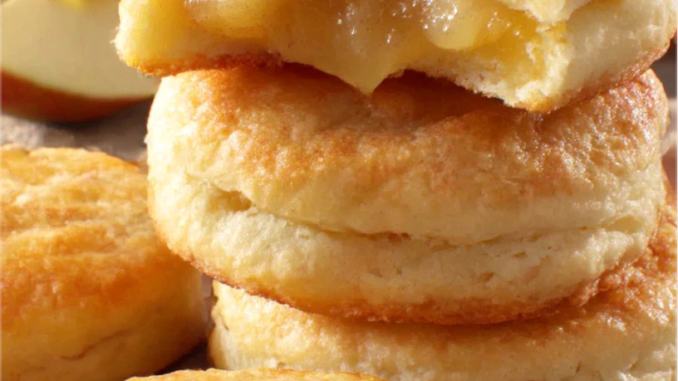
Apple Pie Biscuits
Few desserts capture the feeling of fall quite like warm apple pie, but a full pie takes time, patience, and a free afternoon. Apple Pie Biscuits deliver the same cozy flavors in a fraction of the time. Imagine a golden, flaky biscuit wrapped around spiced apple filling, brushed with butter, rolled in cinnamon sugar, and finished with a sweet vanilla drizzle. They come out of the oven in about half an hour, they are easy enough for a weeknight, and they are impressive enough for a holiday brunch. Whether you start with a can of refrigerated biscuits or make your dough from scratch, this guide will show you how to build the perfect apple pie biscuit, from the filling and the spices to baking methods, toppings, storage, and creative variations. Once you taste that first warm, gooey bite, you will understand why this humble little bake has become a seasonal favorite in kitchens everywhere.
What Are Apple Pie Biscuits?
Apple Pie Biscuits are a clever shortcut dessert that combines two beloved baked goods into one. A soft biscuit, either canned or homemade, is filled or topped with sweet, cinnamon-spiced apple pie filling, then baked until golden and finished with butter, sugar, and icing. Some versions wrap the filling inside the biscuit like a little pocket, while others spoon the apples over the top so they caramelize in the oven. Both styles are delicious, and both taste remarkably like apple pie, with a fraction of the effort. The biscuit provides the buttery, flaky base that pie crust usually supplies, while the apples bring the sweetness, warmth, and spice. They are best served warm, when the filling is soft and the icing is just beginning to melt. Think of them as individual apple pies you can hold in your hand, no fork or plate required.

Why Everyone Loves Them
The appeal of Apple Pie Biscuits is easy to understand once you have tried one. First, they are fast. From opening the can to pulling a golden tray from the oven takes about thirty-five minutes, which makes them realistic for busy weeknights and last-minute guests. Second, they are forgiving. Biscuit dough is sturdy, the filling is already cooked or easy to cook, and there is no lattice crust to weave or pie dish to worry about. Third, they are portion-perfect. Each person gets their own warm biscuit, which makes them ideal for brunches, potlucks, and bake sales. Finally, they are nostalgic. The smell of cinnamon, butter, and baked apples fills the kitchen and instantly reminds people of autumn, holidays, and family gatherings. A dessert that is quick, easy, individual, and deeply comforting is a rare combination, and that is exactly why these biscuits have such a loyal following.

Canned Biscuits vs. Homemade Dough
The first decision you will make is whether to use canned refrigerated biscuits or homemade dough, and honestly, both paths lead to delicious results. Canned biscuits are the weeknight hero: they are consistent, they bake up tall and golden, and they cut the prep time down to minutes. Buttermilk varieties work especially well because their slight tang balances the sweet filling. Homemade dough, on the other hand, gives you a flakier, more tender biscuit with a richer butter flavor, and you can control the sweetness and the thickness. If you make your own, keep the butter cold and handle the dough as little as possible for the flakiest layers. There is no shame in the canned route, and no requirement to go homemade. Choose based on your time and mood: canned for speed, homemade for a weekend project, and either way, the apples will do the heavy lifting.

Choosing the Apple Filling
The filling is the heart of the biscuit, so it deserves a little thought. Canned apple pie filling is the fastest option, and it works beautifully if you chop the apple pieces a bit smaller so they fit neatly inside or on top of the biscuits. If you have a few extra minutes, a homemade filling is worth it: peel and dice two or three firm apples, such as Granny Smith or Honeycrisp, and cook them in a skillet with butter, brown sugar, cinnamon, and a squeeze of lemon until they are just tender. Firm apples hold their shape during baking, while softer varieties can turn mushy. Taste the filling before you use it and adjust the sweetness, because canned fillings vary and fresh apples range from tart to very sweet. A filling that tastes great on its own will taste even better wrapped in a warm biscuit.

The Essential Spices
Spices are what turn sweet apples into apple pie flavor, and getting the balance right matters more than any fancy technique. Cinnamon is the star, warm and sweet, and one tablespoon per batch is a good starting point. Nutmeg adds depth, but a little goes a long way, so use just an eighth of a teaspoon. A pinch of allspice or cloves can add a lovely autumn warmth, though too much clove can overpower everything else. Vanilla extract, stirred into the filling or the icing, rounds out the flavors and makes the whole biscuit taste more finished. Some bakers add a pinch of salt, which sharpens the sweetness and keeps the filling from tasting flat. If you love apple pie spice, a ready-made blend works perfectly here. Whatever combination you choose, mix the spices into the sugar before coating the biscuits so every bite gets an even, fragrant dusting.

Step-by-Step Classic Recipe
Here is the classic version that most people start with, and it is a great foundation for every variation that follows. Lightly grease a baking dish or cast-iron skillet. In a small bowl, mix half a cup of brown sugar with a tablespoon of cinnamon and an eighth of a teaspoon of nutmeg. Dip each biscuit in melted butter, then roll it in the sugar mixture so it is coated on all sides. Arrange the biscuits in the dish, leaving a little space between them. Chop one can of apple pie filling into smaller pieces, stir in a teaspoon of vanilla, and spoon the apples generously over and around the biscuits. Drizzle any remaining melted butter over the top and sprinkle on the leftover sugar. Bake at 375 degrees Fahrenheit for about thirty-five minutes, until the biscuits are golden and the filling is bubbling. Let them cool for five minutes, drizzle with icing, and serve warm.

The Skillet Method
Baking Apple Pie Biscuits in a cast-iron skillet is the most rustic and crowd-pleasing way to serve them. The skillet holds heat beautifully, so the biscuits bake evenly and the edges get deliciously caramelized where the sugary butter meets the hot iron. It also makes a gorgeous presentation: you can carry the whole skillet to the table and let everyone pull apart their own warm biscuit. To use this method, butter the skillet well, arrange the coated biscuits in a single layer, and spoon the apples over the top. Because cast iron retains heat, the biscuits may bake a few minutes faster than in a glass dish, so start checking at thirty minutes. Let the skillet rest for five minutes before serving, and warn everyone that the handle is hot. A scoop of vanilla ice cream melting over a skillet biscuit is one of the great simple desserts.

Baking in the Oven
If you do not own a skillet, a regular baking dish works just as well and is often easier to manage. A nine-by-thirteen-inch dish fits a full can of biscuits with room for the apples to bubble around them, while a smaller dish packs the biscuits closer together, which makes them softer and more pull-apart in style. Line the dish with parchment paper if you want easy cleanup, though a well-buttered dish will release the biscuits fine on its own. Bake at 375 degrees Fahrenheit on the middle rack so the tops brown evenly without the bottoms burning. If the tops are browning too quickly, tent the dish loosely with foil for the last ten minutes. The biscuits are done when they are deep golden brown, the filling is bubbling at the edges, and a toothpick inserted into a biscuit comes out clean. Let them rest briefly so the filling thickens slightly before serving.

Air Fryer Version
The air fryer is a wonderful option when you want just a few biscuits rather than a whole tray. Line the air fryer basket with parchment paper, place two or three filled biscuits inside with space between them, and cook at 330 degrees Fahrenheit for about twelve to fifteen minutes, until golden. The circulating hot air gives the biscuits a crisp, bakery-style exterior that is hard to achieve in a regular oven. Because air fryers vary, check the first batch a few minutes early, and remember that the apples on top can brown quickly, so a loose foil cover for the last few minutes can help. The air fryer version is perfect for a quick after-school snack or a small breakfast for two. Just be careful not to overcrowd the basket, since the biscuits need room for the hot air to circulate and crisp their sides.

The Buttery Sugar Coating
The buttery sugar coating is what gives Apple Pie Biscuits their irresistible, slightly crunchy exterior. The technique is simple but worth doing properly. Melt half a cup of butter and let it cool slightly so it is warm but not hot. In a separate bowl, combine the brown sugar, cinnamon, and nutmeg. Dip each biscuit into the butter, turning it so every side is coated, then roll it in the sugar mixture, pressing gently so the sugar sticks. The butter acts as glue, and the sugar caramelizes in the oven into a thin, crackly crust. If you skip this step, the biscuits will still taste good, but they will miss that bakery-style finish. For an extra-crisp top, sprinkle a little extra sugar over the biscuits just before they go into the oven, and do not be shy with the butter: this is a dessert, after all.

Making the Vanilla Icing
A simple vanilla icing is the finishing touch that makes these biscuits look and taste complete. Whisk together half a cup of powdered sugar, one tablespoon of milk, and a quarter teaspoon of vanilla extract until the mixture is smooth and pourable. If it is too thick, add milk a teaspoon at a time; if it is too thin, add a little more powdered sugar. Drizzle the icing over the warm biscuits in a zigzag pattern using a spoon or a small zip-top bag with the corner snipped off. Apply the icing while the biscuits are still warm but not piping hot, so it melts slightly into the tops without disappearing completely. For a richer icing, swap the milk for cream, or add a tablespoon of softened cream cheese for a tangy, frosting-like finish. The icing is optional, strictly speaking, but it is the detail that makes people reach for a second biscuit.

Caramel Drizzle Upgrade
If you want to take Apple Pie Biscuits from delightful to unforgettable, add a caramel drizzle. Warm caramel sauce, either store-bought or homemade, poured over the baked biscuits adds a buttery, toffee-like richness that pairs perfectly with cinnamon apples. A salted caramel version is especially good, because the salt sharpens the sweetness and keeps the dessert from tasting one-note. Drizzle the caramel over the biscuits after the icing, or skip the icing entirely and let the caramel be the star. For a caramel apple variation, stir a few tablespoons of caramel sauce directly into the apple filling before baking, so every bite has a gooey, caramelized center. A sprinkle of chopped toasted pecans over the caramel adds crunch and makes the whole dish feel like a deconstructed caramel apple, which is exactly the kind of dessert people remember.

Serving for Breakfast
Apple Pie Biscuits make a wonderful breakfast treat, especially on slow weekend mornings. Serve them warm with a cup of coffee or tea, and they feel like a special occasion without requiring any special effort. Because they are individually portioned, they are easy to serve to a crowd at a brunch table, and they pair beautifully with savory breakfast foods like eggs and bacon, which balance the sweetness. If you want to make them a little more breakfast-appropriate, go lighter on the icing and serve them with fresh fruit on the side. A small bowl of Greek yogurt with a drizzle of honey also works nicely alongside the warm biscuits. The best part of a breakfast serving is the smell: cinnamon and baked apples drifting through the house is a better alarm clock than any app, and it tends to bring everyone to the table quickly.

Brunch and Holiday Table
During the holidays, Apple Pie Biscuits earn their place on the brunch table beside the egg casserole and the fruit salad. They look festive, they feed a crowd, and they can be assembled the night before and baked in the morning, which is a gift to any holiday host. To prep ahead, arrange the coated biscuits and apples in the dish, cover tightly, and refrigerate overnight. In the morning, let the dish sit at room temperature for fifteen minutes while the oven preheats, then bake as usual, adding five extra minutes to the time. A holiday presentation tip: bake them in a cast-iron skillet, dust the finished biscuits lightly with powdered sugar so they look snow-kissed, and garnish the table with a few cinnamon sticks and apple slices. It is a small effort that makes the whole table feel considered and seasonal.

Dessert-Style Serving
When served as dessert, Apple Pie Biscuits can hold their own against far fancier sweets. The classic move is a warm biscuit with a scoop of vanilla ice cream, where the cold cream melts into the spiced apples and creates an instant sauce. A dollop of whipped cream and a sprinkle of cinnamon is a lighter alternative that still feels indulgent. For a dinner party, serve one biscuit per person on a small plate with a drizzle of caramel and a few toasted pecans, which makes a modest bake look restaurant-worthy. You can also crumble a leftover biscuit over a bowl of ice cream or yogurt for an easy apple pie parfait. However you present them, serve them warm if you possibly can. The difference between a warm biscuit with melting icing and a cold one is the difference between a good dessert and a memorable one.

Storing and Reheating
Apple Pie Biscuits are best the day they are baked, but they store surprisingly well. Keep leftovers in an airtight container at room temperature for up to two days, or in the refrigerator for up to four days. To reheat, warm individual biscuits in the microwave for fifteen to twenty seconds, or in a 300-degree oven for about ten minutes, which restores some of the crispness. Avoid reheating them too long, since the icing can melt away and the biscuits can dry out. If you plan to store them, consider holding back the icing and drizzling it fresh after reheating, which gives the biscuits a just-baked look and taste. A brief warm-up makes a day-old biscuit taste almost as good as a fresh one, and a scoop of ice cream can rescue even the driest leftover. In practice, though, leftovers are rarely a problem with this recipe.

Freezing for Later
Freezing is a smart move if you want apple pie biscuits on demand without starting from scratch. You can freeze them baked or unbaked. To freeze unbaked, assemble the biscuits in a freezer-safe dish, cover tightly with plastic wrap and foil, and freeze for up to two months. Bake straight from frozen, adding ten to fifteen minutes to the baking time and tenting with foil if the tops brown too fast. To freeze baked biscuits, let them cool completely, skip the icing, and freeze them in a single layer before transferring to a freezer bag. Reheat frozen baked biscuits in a 325-degree oven for fifteen minutes, then ice them fresh. Either method gives you a warm, homemade-tasting treat on a busy morning with almost no effort, which is exactly the kind of kitchen shortcut that makes life easier.

Fun Variations
Once you have mastered the classic version, the variations are endless, and each one is worth trying. A streusel topping made from flour, butter, brown sugar, and oats adds a crunchy, coffee-cake-like finish. A cheddar twist, with a small cube of sharp cheddar tucked into each biscuit, plays on the classic apple-and-cheese pairing and surprises people in the best way. For a fall party, add chopped pecans and a splash of bourbon-free caramel to the filling. A cranberry-apple version, with a handful of dried cranberries stirred into the filling, brings a tart brightness that is perfect for Thanksgiving. You can also make mini versions in a muffin tin for bite-sized party treats, or a savory-sweet version with a little less sugar for brunch. The biscuit is a blank canvas, and the apples are just the beginning.

Common Mistakes
A few common mistakes can trip up even experienced bakers, but all of them are easy to avoid. The most frequent problem is soggy bottoms, which usually means the apples released too much liquid; chopping the filling smaller and draining any excess syrup before spooning it on helps a great deal. Underbaked centers are another issue, especially with larger biscuits, so give them the full baking time and check that the centers are cooked through before removing the tray. Too much sugar coating can burn on the bottom of the dish, so use a light hand with the extra sprinkle and line the dish if needed. Finally, icing applied to piping-hot biscuits will slide right off, so wait five minutes before drizzling. Knowing these pitfalls in advance means your first batch can look and taste like your tenth, which is a very satisfying way to start.

Final Tips
A few final tips will help you get the most from every batch. First, taste your filling before baking and adjust the sweetness and spice to your liking, because apples vary widely. Second, do not overcrowd the dish if you want crisp edges; a little space between biscuits lets the heat circulate. Third, serve them warm whenever possible, since the contrast between the warm biscuit and the cool icing is a big part of the appeal. Fourth, keep a can of biscuits and a can of apple pie filling in the pantry, because this recipe is the perfect answer to unexpected guests or a sudden dessert craving. And finally, make a double batch if you are feeding a crowd, because these biscuits disappear fast. With a little practice, Apple Pie Biscuits will become one of those recipes you make on autopilot, the one friends ask for by name.

Apple Pie Biscuits are proof that a great dessert does not need to be complicated. With a can of biscuits, a can of apple filling, and a handful of pantry spices, you can create something warm, golden, and deeply comforting in under an hour. They work for breakfast, brunch, dessert, and everything in between, and they are flexible enough to suit any cook, any kitchen, and any occasion. So preheat the oven, grab the cinnamon, and give them a try. The smell alone is worth it, and the first warm bite will convince you that this simple little bake deserves a permanent place in your recipe collection. Happy baking, and do not be surprised when the tray empties before you have even sat down.
Leave a Reply