
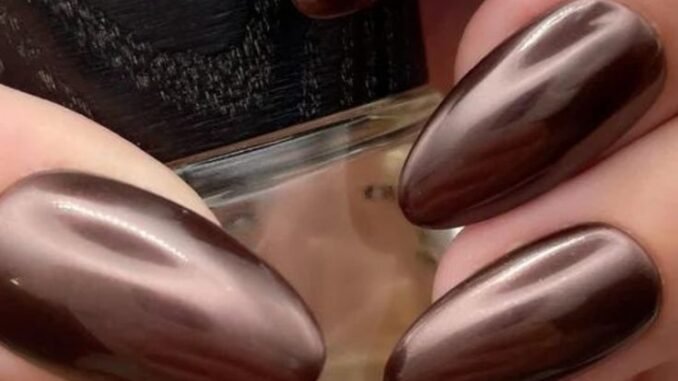
Chocolate Glaze Nails
Chocolate glaze nails are the manicure equivalent of a favorite dessert: rich, glossy, and quietly luxurious. Inspired by glazed donuts and melted chocolate, this look pairs deep brown tones with a shiny, almost wet finish that catches the light with every movement. It is elegant enough for work, soft enough for everyday wear, and rich enough for special occasions. Whether you prefer a classic dark chocolate shade, a lighter milk chocolate tone, or a chrome-glazed finish, this guide covers the shades, shapes, finishes, and care tips that make chocolate glaze nails look their best.
What Are Chocolate Glaze Nails
Chocolate glaze nails take their name from two ideas: the color of chocolate and the shiny finish of a glaze. The base color is usually a warm brown, ranging from deep dark chocolate to lighter milk chocolate, and the top layer adds a high-gloss, glazed effect. The result looks smooth, rich, and slightly reflective, much like the surface of a freshly glazed donut or a bar of polished chocolate.
The look became popular because it offers the polish of a neutral manicure with more warmth and depth than nude or beige. Brown suits many skin tones, works in every season, and pairs easily with gold jewelry, cozy knitwear, and autumn colors. It is also a flexible starting point: you can keep it plain, add chrome powder for a glazed donut effect, or use it as a base for French tips, dots, and nail art.

The Classic Dark Chocolate Glaze
Dark chocolate is the most iconic version of this trend. It is deep, glossy, and sophisticated, sitting somewhere between black and brown so it reads as a rich neutral rather than a harsh dark color. On short nails, dark chocolate looks neat and modern, while on longer nails it feels dramatic and elegant. It is an excellent choice if you want a manicure that works for both the office and an evening out.
To get the best result, choose a polish with a true chocolate undertone rather than one that leans too red or too black. Two thin coats usually give full, even coverage, and a glossy top coat is essential for the glazed look. Dark chocolate also hides minor chips better than very pale shades, which makes it a practical choice for busy weeks when you cannot get to the salon often.

Milk Chocolate and Lighter Brown Shades
Milk chocolate nails are softer and lighter than dark chocolate, with a warm, creamy brown tone that flatters many skin tones. They feel approachable and relaxed, making them a good everyday shade, and they pair beautifully with cream, camel, and soft pink clothing. If dark brown feels too bold for you, milk chocolate is an easy way into the trend.
Lighter browns also show the glazed finish well, because light reflects clearly off the smooth surface. They work especially well on medium and longer nails, where the color has room to show its warmth. For a subtle variation, try a milk chocolate base with a slightly darker tip, or add a thin chrome layer to give the lighter shade a soft, luminous glow.

The Glazed Donut Finish Explained
The glazed donut finish is what turns a simple brown manicure into chocolate glaze nails. It usually comes from a chrome or pearl powder rubbed over the color, or from a very glossy top coat that creates a smooth, reflective surface. The finish should look like light moving across the nail, not like heavy glitter or a matte texture. When done well, it makes even a plain brown shade look special.
If you are doing this at home, apply the chrome powder over a no-wipe top coat, then seal it with another top coat to protect the shine. At the salon, ask for a brown base with a chrome glaze, and show a photo so your technician understands the level of shine you want. A light chrome layer keeps the look soft, while a heavier layer gives a stronger, mirror-like effect.

Chocolate Glaze French Tips
Chocolate French tips are a fresh twist on the classic French manicure. Instead of white tips, the nail ends are painted in chocolate brown, often with a glazed finish, over a nude or sheer pink base. The result is softer than a traditional French manicure and more interesting than a plain brown nail, making it a favorite for weddings, work, and everyday wear.
This design works on many nail shapes, but it looks especially clean on almond and oval nails, where the tip follows the natural curve of the nail. For a modern version, try a thin chocolate tip with a chrome glaze, or a deeper tip that covers more of the nail. The contrast between the sheer base and the rich tip is what makes the design feel refined rather than busy.

Almond, Oval, and Coffin Shapes for Chocolate Glaze
Nail shape changes how chocolate glaze looks, so it is worth choosing deliberately. Almond nails give a soft, elegant point that suits the glossy finish, while oval nails feel classic and natural. Coffin and stiletto shapes make the look more dramatic, which suits longer nails and statement styling. Short, rounded nails, on the other hand, keep the trend practical and neat.
If you are new to the trend, almond or oval is a safe starting point, since both shapes flatter most hands and work with both plain and glazed finishes. Longer shapes need a little more care to avoid breakage, especially if you use gel or extensions. Whatever shape you choose, keep the edges smooth and the length even, because a glossy finish shows uneven edges more clearly than a matte one.

Short Chocolate Glaze Nails That Still Look Polished
Short nails suit chocolate glaze beautifully, because the rich color and glossy finish make them look intentional rather than plain. A short, rounded or squoval shape with dark chocolate polish is a classic, low-maintenance choice that works for typing, cooking, and everyday tasks. It also grows out gracefully, which is useful if you do your nails at home.
For short nails, keep the design simple. A single chocolate shade with a glossy top coat is often enough, though a subtle chrome glaze can add interest without making the nails look crowded. Avoid very detailed art on very short nails, since small designs can look cluttered. The goal is a clean, rich manicure that looks polished from a normal distance, not just up close.

Chocolate Drip and Playful Nail Art
Chocolate drip designs lean into the dessert inspiration behind this trend. In this style, a lighter base is decorated with dark chocolate drip shapes near the cuticle or tip, mimicking melted chocolate running down a donut. It is playful, eye-catching, and best used as an accent on one or two nails, with the rest kept in a matching plain shade.
Drip designs work best when the colors contrast clearly, such as dark chocolate on a nude base, and when the drips are neat and varied in length. A fine brush or a dotting tool helps create clean shapes. Because this design is bolder than plain glaze, it suits parties, holidays, and weekends, though a subtle version can also work for everyday wear if the rest of the manicure stays simple.

Dots, Stripes, and Patterned Chocolate Nails
Patterned chocolate nails use the brown palette in creative ways, from polka dots and stripes to checks and swirls. These designs work because brown and cream create a warm, high-contrast combination that is easy to read on the nail. Mixing patterns across nails, such as dots on one nail and stripes on another, can look fun without feeling chaotic if the colors stay consistent.
To keep patterned nails looking polished, use a limited palette of two or three shades and leave at least one nail plain. This gives the eye a place to rest and stops the manicure from looking too busy. Patterns are also a good way to use up leftover brown polishes, since small amounts of each shade are enough for dots or lines. They are ideal for anyone who likes nail art but still wants a wearable result.

Chocolate Glaze With Gold and Jewelry
Chocolate nails and gold jewelry are a natural pairing. The warmth of brown brings out the warmth of gold, and the glossy finish echoes the shine of rings and bracelets. Simple gold bands, delicate chains, and small studs all look beautiful with chocolate glaze, and the combination feels luxurious without being flashy. This is one reason the trend photographs so well.
When styling jewelry with chocolate nails, you do not need much. One or two gold pieces are usually enough, and they should not compete with detailed nail art. If your nails have a bold design, keep jewelry minimal, and if your nails are plain, a slightly bolder ring can add interest. Silver can also work, especially with cooler brown shades, but gold is the classic partner for chocolate tones.

Chocolate Glaze for Different Skin Tones
One reason chocolate glaze nails are so popular is that brown suits a wide range of skin tones, as long as you choose the right depth. Deeper skin tones can carry dark chocolate and rich espresso shades beautifully, while lighter skin tones often suit milk chocolate and medium browns. The key is contrast: the shade should stand out from your skin without looking too harsh or too close to it.
If you are unsure, try two shades side by side on different nails and see which one looks more balanced in daylight. Cooler browns, with a slight purple or grey undertone, suit cooler skin, while warmer, redder browns suit warmer skin. A glazed finish helps in all cases, because the shine adds lightness and keeps even a dark shade from looking flat.

Gel, Regular Polish, and Press-On Options
Chocolate glaze nails can be achieved with gel polish, regular polish, or press-on nails, and each option has benefits. Gel gives the longest wear and the glossiest finish, making it ideal if you want the manicure to last two weeks or more. Regular polish is easier to remove and change, which suits people who like to switch shades often. Press-ons offer an instant result with no drying time.
For a glazed finish at home, regular polish with a high-gloss top coat can look very close to gel, though it will chip sooner. If you use press-ons, choose a chocolate shade with a glossy finish and file the edges to fit your nails well. Whichever method you choose, start with clean, dry nails and a good base coat, since the finish will only look as smooth as the surface underneath.

How to Do Chocolate Glaze Nails at Home
Doing chocolate glaze nails at home is straightforward if you take your time. Start by shaping your nails, pushing back cuticles gently, and removing any old polish. Apply a base coat, then two thin coats of chocolate polish, allowing each coat to dry for a few minutes. Finish with a glossy top coat, and clean up the edges with a small brush dipped in remover for a salon-clean result.
For a chrome glaze, apply chrome powder over a no-wipe top coat before the final top coat, rubbing it in lightly with an applicator. Work one nail at a time so the powder sets evenly, and avoid touching the nails until the final top coat is dry. Patience is the most important tool: rushing between coats is the main reason home manicures look uneven or bubbly.

Salon Tips: What to Ask For
At the salon, a photo is the most helpful thing you can bring, since chocolate glaze covers several shades and finishes. Tell your technician whether you want dark or milk chocolate, a plain gloss or a chrome glaze, and how long you want the manicure to last. This helps them choose between gel and regular polish and select the right top coat for the finish you want.
Also discuss nail shape and length before the polish goes on, since changing shape later is harder. If you want nail art, ask which nails will be accents and agree on the design before starting. A good technician will also check your nail health and suggest a strengthening base coat if your nails are weak or peeling. Clear communication at the start saves time and avoids disappointment.

Making Chocolate Glaze Nails Last Longer
Glossy nails show chips more clearly than matte ones, so a few habits help your chocolate glaze last. Wear gloves for washing up and cleaning, avoid using nails as tools, and apply a fresh layer of top coat every two or three days to refresh the shine. These small steps can add several days to a manicure, whether it is gel or regular polish.
Keep cuticle oil nearby and use it daily, since moisturized cuticles make the whole manicure look fresher. If a small chip appears, you can often touch it up with the same polish and a top coat rather than removing the whole manicure. For gel nails, avoid peeling the polish off, since this damages the nail surface and makes the next manicure less smooth.

Chocolate Glaze Nails for Autumn and Winter
Chocolate glaze nails feel made for autumn and winter. They match cozy knitwear, leather boots, and warm coats, and they look beautiful against the muted colors of the season. Dark chocolate is especially popular in colder months, when richer colors feel natural, while milk chocolate works as a softer option for early autumn. The glossy finish also stands out nicely in low winter light.
For seasonal styling, pair chocolate nails with cream sweaters, camel coats, and gold accessories for a warm, coordinated look. In December, you can add a subtle festive accent, such as a single gold dot or a thin metallic line, without losing the elegance of the base shade. Chocolate glaze is a seasonal favorite that still works year-round, which is part of its lasting appeal.

Chocolate Glaze Nails for Spring and Summer
Chocolate glaze can work in warmer months too, if you choose lighter shades and simpler finishes. Milk chocolate, caramel, and soft mocha tones feel lighter than dark chocolate and pair well with white, pastel, and bright summer clothing. A glossy finish also suits summer, since it echoes the shine of sandals and light fabrics.
For summer, keep the nails shorter and the design minimal, so the rich color does not feel heavy. A milk chocolate glaze with a single accent nail, or a chocolate French tip, is a good warm-weather version. You can also try a lighter brown chrome, which reflects sunlight beautifully and feels fresh rather than wintry. The trend is flexible enough to adapt to any season with the right shade.

Nail Health Under a Glossy Manicure
Healthy nails are the foundation of a good chocolate glaze manicure, since gloss highlights both smooth and rough surfaces. Keep nails hydrated with cuticle oil, avoid harsh removers too often, and give nails a short break between gel manicures if they feel thin or weak. A strengthening base coat can help if your nails peel or break easily.
Also pay attention to cuticle care. Gently pushing cuticles back, rather than cutting them aggressively, protects the nail bed and helps polish last longer. If you notice persistent peeling, splitting, or discoloration, it is worth taking a break from polish and letting nails recover. A beautiful manicure starts with healthy nails, and a little care between manicures makes a visible difference.

Mistakes to Avoid With Chocolate Glaze
The most common mistake with chocolate glaze is choosing a shade that is too dark or too warm for your skin, which can make hands look tired rather than polished. Testing shades in daylight helps avoid this. Another mistake is skipping the top coat, which is what creates the glazed effect; without it, brown polish can look flat and dull, even if the color is beautiful.
Other mistakes include applying coats too thickly, which causes bubbling and slow drying, and overloading the nails with art, which hides the glaze. Keep coats thin, let each layer dry, and let the color and shine do most of the work. If you want art, use it on one or two accent nails. Simple, well-executed chocolate glaze almost always looks better than a complicated design done hurriedly.

Final Thoughts on Chocolate Glaze Nails
Chocolate glaze nails have stayed popular because they are easy to wear, easy to adapt, and quietly luxurious. They offer the richness of a dark color without the severity of black, and the gloss of a statement manicure without the fuss of heavy art. Whether you choose dark chocolate, milk chocolate, or a chrome-glazed finish, the result is a manicure that feels thoughtful and polished.
Start with a shade that suits your skin and your daily life, choose a shape that feels comfortable, and invest in a good top coat. From there, you can experiment with French tips, drip designs, or seasonal accents whenever you want a change. Chocolate glaze nails are a trend that rewards simplicity, and that is why they are likely to stay in style long after other nail trends fade.

Chocolate glaze nails work because they are both simple and indulgent. A rich brown shade, a glossy finish, and a shape that suits your hands are all you really need for a manicure that feels polished without trying too hard. From classic dark chocolate to playful drip designs and soft chrome glazes, there is a version for every style and season. Choose a shade you love, keep the nails healthy underneath, and enjoy a manicure that goes with everything in your wardrobe.
Leave a Reply